专题
Startup
IdentityServer 是各个服务与中间件的结合. 所有的配置都在 startup 中完成.
配置服务
使用 AddIdentityServer() 方法添加 IdentityServer 服务到 DI 中.
public void ConfigureServices(IServiceCollection services) {
  var builder = services.AddIdentityServer();
}
作为可选项, 可以在该方法内传入 Lambda 来进行配置, 可配置项可参考[引用](file:///C:/Users/jk/Desktop/Ids4-dosc-notes/identityserver4-latest/index.html#refoptions).
Key material
IdentityServer 支持 X.509 证书, RSA Key, 以及 EC Key 来为令牌签名和校验. 每一个键都可以配置签名算法. 例如: RS256, RS384, RS512, PS256, PS384, PS512, ES256, ES384, 或 ES512.
可以使用下面方法来配置 Key material:
AddSigningCredential添加 signing key, 该 key 提供指定的 key material 来为各种 token 提供创建/校验的服务.
AddDeveloperSigningCredential在 启动时 创建临时 key material. 主要用于开发模式, 默认会将生成的 key 存储与本地目录.
AddValidationKey添加 Key 来验证 token. 它会被用于内部 token 的校验, 并会显示在发现文档中.
内存中的配置存储
各种 "in-memory" 配置 API, 会在内存中存储 IdentityServer 的配置对象.
- 内存中的集合可以在主机中硬编码实现.
- 也可以动态的从配置文件或数据库中加载.
从设计上来说, 这些数据在启动时被创建.
使用这些接口都没有访问数据库, 旨在测试, 开发环境下使用. 但是如果在生产环境中基本不会有变化时, 也可以使用这个方式.
AddInMemoryClients基于
Client配置对象, 在内存中注册IClientStore和ICorsPolicyService的实现.AddInMemoryIdentityResources基于
IdentityResource配置对象, 在内存中注册IResourceStore的实现.AddInMemoryApiScopes基于
ApiScope配置对象, 在内存中注册IResourceStore的实现.AddInMemoryApiResources基于
ApiResource的配置对象, 在内存中注册IResourceStore的实现.
Test Store
TestUser 类是测试用的用户模型. 提供了必要的用户信息数据, 并存储与内存中. 开发环境中不建议使用该方式.
AddTestUsers使用
TestObject对象集来注册TestUserStore. 该数据仅用于 快速开始中. 同时注册了IProfileService和IResourceOwnerPasswordValidator的实现.
Additional Service
AddExtensionGrantValidator为扩展授权添加
IExtensionGrantValidator的实现AddSecretParser为转换客户端或 API resource 证书注册
ISecretParser实现AddSecretValidator为验证 客户端 或 API resource 证书添加
ISecretValidator实现AddResourceOwnerValidator为验证资源所有者密码凭证验证模式添加
IResourceOwnerPasswordValidator的实现.AddProfileService添加
IProfileService实现来连接自定义用户 profile 存储.DefaultProfileService类提供的默认实现, 将 cookie 鉴权方式作为办法 token 的唯一声明来源.AddAuthorizeInteractionResponseGenerator添加
IAuthorizeInteractionResponseGenerator实现. 来实现, 当必须在UI 上显示错误消息时, 在授权端点上使用自定义逻辑来处理.AuthorizeInteractionResponseGenerator类是默认实现. 因此在需要扩展时建议从该类派生.AddCustomAuthorizeRequestValidator添加
ICustomAuthorizeRequestValidator实现, 来支持在 授权端点对自定义请求参数的校验.AddCustomTokenRequestValidator添加
ICustomTokenRequestValidator实现, 来支持在 token 端点对请求参数进行校验.AddRedirectUrlValidator添加
IRedirectValidator实现, 来实现对自定义重定向 URL 的校验AddAppAuthRedirectValidator添加
AppAuth(原生 App 的 OAuth 2.0) 兼容的重定向 URL 的验证. (执行严格校验, 但是支持 127.0.0.1 上的随机端口).AddJwtBearerClientAuthentication使用 JWT bearer 来进行客户端鉴权.
AddMutualTlsSecretValidators添加
X509秘钥验证, 为 mutual TLS.
缓存 Cache
客户端和资源配置数据在 IdentityServer 中会频繁的使用. 如果将该数据从数据库或第三方存储中来获得, 会频繁的获取同样的数据.
AddInMemoryCaching使用上述任意的缓存,
ICache<T>的实现必须在 DI 中注册. API 中注册的使用内存的ICache<T>的默认实现是基于 ASP.NET Core 的MemoryCache.AddClientStoreCache注册
IClientStore装饰器的实现, 主要维护内存中的Client配置对象的缓存. 在IdentityServerOptions的Caching配置中对其进行配置.AddResourceStoreCache注册
IResourceStore装饰器的实现, 来维护内存缓存中IdentityResource和ApiResource的配置对象. 在IdentityServerOptions的Caching配置中对其进行配置.AddCorsPolicyCache注册
ICorsPolicyService装饰器的实现, 来维护内存缓存中 CORS 策略服务计算的结果. 在IdentityServerOptions的Caching配置中对其进行配置.
还可以进一步自定义缓存:
默认缓存依赖于 ICache<T> 的实现. 如果要自定义实现缓存, 可以在 DI 系统中替换该实现.
默认的 ICache<T> 的实现, 依赖于 IMemoryCache 接口 (以及 MemoryCache 的实现), 它是有 .NET 所提供的. 若果需要自定义内存缓存的行为, 在 DI 中替换 IMemoryCache 的实现.
配置管道
通过调用下面代码来将 IdentityServer 添加到管道中:
public void Configure(IApplicationBuilder app) {
  app.UseIdentityServer();
}
注意
UseIdentityServer内包含了UseAuthentication, 可以不用重复调用.
需要注意中间件的顺序.
定义资源
OpenId Connect/OAuth token 服务的最终目的是控制资源的访问.
IdentityServer 中的基础类型:
identity resource: 表示的是与用户有关的声明 (claim) 资源. 例如: 用户 ID, 展示名字, email 等.API resource: 表示客户端想要访问的功能资源. 一般, 基于 HTTP 端点 (也就是我们所说的 API). 但也可以是类似于消息队列的端点.
注意:
你可以使用 C# 对象来定义资源. 或从数据存储中加载. 使用
IResourceStore的实现来处理底层细节. 本文档使用基于内存的实现.
jk: 所以资源可以是数据, 可以是被访问的 API.
IdentityResource
Identity Resource 是一组具名的 Claim, 可以使用 scope 参数来请求获得.
OpenId Connect 规范推荐使用标准的 scope 名到 claim 类型的映射来描述它们, 但实际上你可以随意处理.
其中一个实际上是强制性的, 即 openid scope. 它告诉 provider 在 identity token 中返回 sub (subject id) claim.
使用下面的方式来定义 openid scope:
public static IEnumerable<IdentityResource> GetIdentityResource() {
  return new List<IdentityResource> {
    new IdentityResource (
      name: "openid",
      userClaims: new [] { "sub" },
      displayName: "your user identifier"
    )
  };
}
但由于它是规范, 因此可以简化为 (已封装):
public static IEnumerable<IdentityResource> GetIdentityResource() {
  return new List<IdentityResource> {
    new IdentityResource.OpenId()
  };
}
更多的信息, 参考
IdentityResource的引用 (这一小节).
下面的案例描述了使用自定义 identity resource 来请求 profile, 即请求用户名, email 和 网站 claim 等.
public static IEnumerable<IdentityResource> GetIdentityResource() {
  return new List<IdentityResource> {
    new IdentityResource(
      name: "profile",
      userClaims: new [] { "name", "email", "website" },
      displayName: "your profile data"
    )
  };
}
一旦定义了资源, 你可以使用 AllowedScopes 的设置来利用客户端访问它 (省略了其他属性):
var client = new Client {
  ClientId = "client",
  AllowedScopes = { "spenid", "profile" }
};
然后, 客户端可以使用 scope 参数请求资源 (其他参数省略了):
https://demo.identityserver.io/connect/authorize?client_id=client&scope=openid profile
IdentityServer 会使用 scope 的名字来创建所请求的 claim type 的列表. 以及 profile service 的实现.
API
设计API表面可能是一项复杂的任务. IdentityServer 提供了两个原语来帮助你实现.
原本 OAuth2.0 就有 scope 的概念, 它被定义为由客户端请求的访问的范围. 技术上讲, scope 参数是一组由空格分隔的数据. 你需要提供其结构与语义.
在更为复杂的系统中, 通常会引入资源的概念. 它可能是物理或逻辑上的 API. 反过来, 每一个 API 也可以有相应的作用域. 有些作用域可能是资源独占的, 而另一些可以是共享的.
下面首先看看简单的 scope. 然后我们会看看资源是如何帮助构建作用域的.
Scope
构建一个简单系统, 仅有 读取, 写入, 和删除的操作. 可以使用 ApiScope 类来创建:
public static IEnumerable<ApiScope> GetApiScope() {
  return new List<ApiScope> {
    new ApiScope(name: "read", displayName: "读取数据"),
    new ApiScope(name: "write", displayName: "写入数据"),
    new ApiScope(name: "delete", displayName: "删除数据"),
  };
}
然后可以为 Client 提供 Scope:
var webViewer = new Client {
  ClientId = "web_viewer",
  AllowedScope = { "openid", "profile", "read" }
};
var mobileApp = new Client {
  CLient = "mobile_app",
  AllowedScope = { "openid", "profile", "read", "write", "delete" }
};
基于 scope 的授权
如果客户端访问 scope, scope 的值会被包含在 Token 中. 例如:
{
    "typ": "at+jwt"
}.
{
    "client_id": "mobile_app",
    "sub": "123",

    "scope": "read write delete"
}
在获得 token 后解析后即可知道该请求的用户是否具有某些 scope, 即可判断其是否可通过, 使用某功能.
需要注意 scope 仅仅是给客户端授权, 而不是给用户授权, 客户端与用户之间的授权管理需要在程序中编码体现. 例如客户端在某个用户下可以对该用户的数据进行操作, 而不是对其他用户的数据进行操作. 这一部分不在 OAuth 规范中.
你可以在 Scope 中提供其他标识用户的声明 (claim). 下面的配置告诉配置系统, 当授权写写 scope 的时候, 需要将用户的级别附加进来:
var writeScope = new ApiScope {
  name: "write",
  displayName: "写数据",
  userClaims: new[] { "user_level" }
};
如此在 token 中会包含对应的用户信息 (user_level), 即可在代码中控制流程.
注意, 在仅仅使用 scope 的模型中, 没有 audience 添加到 token 中, 因为这个概念不适用. 若你需要使用 aud, 可以在配置中使用
EmitStaticAudience. 它会按照issuer_name/resources 的格式发射一个 aud claim. 如果需要控制使用audclaim, 则使用 资源 API.
参数化 Scope
有时, Scope 带有一定结构 (一定格式), 即 scope 名字可以带有一些参数. 例如 transaction:id 或 read_patient:patientid.
本例中, 会创建一个 scope 的不带参数的部分, 并将其分配给客户端. 在运行时, 使用 IScopeParser 接口来解析 scope 结构.
public class ParameterizedScopeParser: DefaultScopeParser {
  public ParameterizedScopeParser(ILogger<DefaultScopeParser> logger): base (loger) {}

  public override void ParserScopeValue(ParserScopeContext scopeContext) {
    const string transactionScopeName = "transaction";
    const string separator = ":";
    const string transactionScopePrefix = transactionScopeName + separator;

    var scopeValue = scopeContext.RawValue;

    if (scopeValue.StartsWidth(transactionScopePrefix)) {
      var parts = scopeValue.Split(separator, StringSplitOptions.RemoveEmptyEntries);
      if (parts.Length == 2) {
        scopeContext.SetParsedValues(transactionScopeName, parts[1]);
      } else {
        scopeContext.SetError("transaction scope missing transaction parameter value");
      }
    } else if (scopeValue != transactionScopeName) {
      base.ParseScopeValue(scopeContext);
    } else {
      scopeContext.SetIgnore();
    }
  }
}
然后你可以在整个管道中访问解析后的值, 例如在profile服务中:
public class HostProfileService : IProfileService {
  public override async Task GetProfileDataAsync(ProfileDataRequestContext context) {
    var transaction = context.RequestedResources
                             .ParsedScopes
                             .FirstOrDefault(x => x.ParsedName == "transaction");
    if (transaction?.ParsedParameter != null) {
      context.IssuedClaims.Add(new Claim("transaction_id", transaction.ParsedParameter));
    }
  }
}
API 资源
当 API 规模变得比较大的时候, 上述这些扁平化的 scope 列表就不太够用了.
你需要引入一些命名空间来管理维护 scope 名. 甚至是引入组合, 来添加一个更高一层的节点来维护他们, 例如在访问令牌中添加 audience claim. 你也可能会使用多个资源来支持同一个 scope. 有些时候, 需要显示的将 scope 与资源分离.
在 IdentityServer 中, 使用 ApiResource 类, 可以设置附加组织, 看下面的定义:
public static IEnumerable<ApiScope> GetApiScopes()
{
    return new List<ApiScope>
    {
        // invoice API specific scopes
        new ApiScope(name: "invoice.read",   displayName: "Reads your invoices."),
        new ApiScope(name: "invoice.pay",    displayName: "Pays your invoices."),

        // customer API specific scopes
        new ApiScope(name: "customer.read",    displayName: "Reads you customers information."),
        new ApiScope(name: "customer.contact", displayName: "Allows contacting one of your customers."),

        // shared scope
        new ApiScope(name: "manage", displayName: "Provides administrative access to invoice and customer data.")
    };
}
使用 ApiResource 可以定义两个组逻辑 API, 以及其相关的 scope:
public static readonly IEnumerable<ApiResource> GetApiResources()
{
    return new List<ApiResource>
    {
        new ApiResource("invoice", "Invoice API")
        {
            Scopes = { "invoice.read", "invoice.pay", "manage" }
        },

        new ApiResource("customer", "Customer API")
        {
            Scopes = { "customer.read", "customer.contact", "manage" }
        }
    };
}
使用 API 资源的好处:
- 支持 JWT 和 claim. audience claim 的值是 ApiResource 的名字.
- 支持在所有包含的 scope 内添加公共用户声明 (common claim).
- 通过为资源分配API秘密来支持自省.
- 支持为资源配置访问令牌签名算法.
下面看一个案例
客户端请求 invoice.read 和 invoice.pay:
{
    "typ": "at+jwt"
}.
{
    "client_id": "client",
    "sub": "123",

    "aud": "invoice",
    "scope": "invoice.read invoice.pay"
}
客户端请求 invoice.read 和 customer.read
{
    "typ": "at+jwt"
}.
{
    "client_id": "client",
    "sub": "123",

    "aud": [ "invoice", "customer" ]
    "scope": "invoice.read customer.read"
}
客户端请求管理
{
    "typ": "at+jwt"
}.
{
    "client_id": "client",
    "sub": "123",

    "aud": [ "invoice", "customer" ]
    "scope": "manage"
}
迁移到 v4 的步骤 (略)
作用域从资源分离出来, 可自行选择配置与引用, 是在 v4 被引入的.
定义客户端
客户端是一个应用程序, 该程序需要从 IdentityServer 中请求 token.
具体细节不同, 但一般会定义下面内容:
- 唯一的客户端 ID.
- 如果需要, 会定义秘钥.
- 与令牌服务器允许的交互, 通常称为 grant type (授权类型).
- 一个网络资源, 即 identity 以及获得的访问令牌需要发送到的位置 (被称为 redirect URI).
- 客户端允许访问的一组 scope (被称为资源).
运行时, 客户端由
IClientStore的实现来表示. 可以容任意数据源进行加载, 例如配置文件, 或数据库. 本教程使用内存存储, 在ConfigureServices方法中的AddInMemoryClients扩展方法处可进行定制.
定义客户端来进行服务器与服务器的通信
在此场景中, 不存在交互式用户. 一个服务器(即, 客户端, client)要访问 API (即, scope):
public class Clients {
  public static Enumerable<Client> Get() {
    return new List<Client> {
      new Client {
        ClientId = "service.client",
        ClientSecret = { new Secret("secret".Sha256()) },

        AllowedGrantType = GrantTypes.ClientCredentials,
        AllowedScopes = { "api1", "api2.read_only" }
      }
    };
  }
}
定义一个使用鉴权和代理 API 访问的交互式应用
交互式应用程序 (例如 web 应用, 原生桌面/移动端应用) 使用授权码 (authencation code) 流程. 这个流程是最安全的, 因为 token 仅在后端进行传递 (也支持令牌刷新).
var interactiveClient = new Client
{
    ClientId = "interactive",

    AllowedGrantTypes = GrantTypes.Code,
    AllowOfflineAccess = true,
    ClientSecrets = { new Secret("secret".Sha256()) },

    RedirectUris =           { "http://localhost:21402/signin-oidc" },
    PostLogoutRedirectUris = { "http://localhost:21402/" },
    FrontChannelLogoutUri =    "http://localhost:21402/signout-oidc",

    AllowedScopes =
    {
        IdentityServerConstants.StandardScopes.OpenId,
        IdentityServerConstants.StandardScopes.Profile,
        IdentityServerConstants.StandardScopes.Email,

        "api1", "api2.read_only"
    },
};
可以参考 GrantType 来确定客户端的授权类型.
在 appsettings.json 中定义客户端
AddInMemoryClients 扩展方法也支持从 配置文件 中加载客户端.
"IdentityServer": {
  "IssuerUri": "urn:sso.company.com",
  "Clients": [
    {
      "Enabled": true,
      "ClientId": "local-dev",
      "ClientName": "Local Development",
      "ClientSecrets": [ { "Value": "<Insert Sha256 hash of the secret encoded as Base64 string>" } ],
      "AllowedGrantTypes": [ "client_credentials" ],
      "AllowedScopes": [ "api1" ],
    }
  ]
}
然后配置代码中使用:
AddInMemoryClients(configuration.GetSection("IdentityServer:Clients"))
Sign-In
为了让 IdentityServer 代表用户来发布令牌, 用户必须登录到 IdentityServer.
Cookie 鉴权
鉴权是通过 cookie 来跟踪的, 该 cookie authentication handler 由 ASP.NET Core 提供.
IdentityServer 注册了两个 Cookie 处理程序 (一个用于鉴权会话, 一个用于临时外部 Cookie). 这些是默认使用的, 你可以通过 IdentityServer.Constants 类 (DefaultCookieAuthenticationScheme 和 ExternalCookieAuthenticationScheme) 来获得其名字, 如果你想要手动引用他们的话.
这些 Cookie 仅仅提供了基础功能 (过期时间, 以及滑动时间), 但是如果需要更为详细的控制, 你可以注册自定义的处理程序.
在 ASP.NET Core 中使用 AddAuthentication() 时, IdentityServer 会通过 AuthenticationOptions 的 DefaultAuthenticationScheme 来配置 Cookie 处理程序
注意
除了鉴权 cookie, IdentityServer 还会生成一个附加的 Cookie, 默认名为 "idsrv.session". 该 Cookie 从 鉴权 Cookie 中派生, 用于基于浏览器的 js 客户端在 signout 时, 检查 session 端点. 它与鉴权用的 Cookie 同步, 并在退出时被删除.
重写 cookie 处理程序的配置
如果要自己控制 cookie, 就需要自己实现. 这一过程需要在 IdentityServer 注册到 DI 之后进行 (AddIdentityServer). 例如:
services.AddAuthentication("MyCookie")
  .AddCookie("MyCookie", opts => {
    opts.ExpireTimeSpan = ...;
  });
注意
IdentityServer 内部调用了
AddAuthentication和AddCookie来自定义 scheme (通过常量IdentityServerConstants.DefaultCookieAuthenticationScheme), 因此需要确保调用AddIdentityServer之后再重写.
登录用户接口和表示管理系统
Login User Interface and Identity Management System
IdentityServer 没有为用户鉴权提供任何用户接口和用户数据库. 这些都是需要你来实现的.
如果你需要使用基本的 UI (登录, 登出, 许可, 或管理授权), 你可以使用 quickstart UI.
快速 UI 使用内存存储数据, 你可以将其更换为 ASP.NET Core Identity.
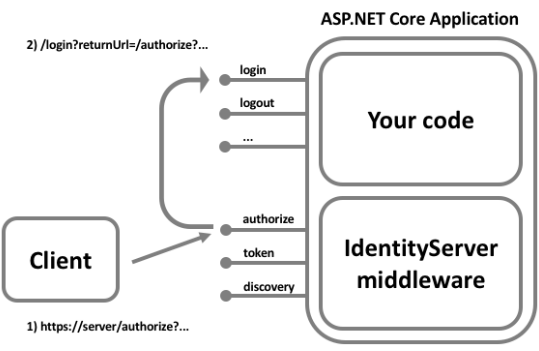
登录流程
Login workflow
等 IdentityServer 的鉴权端点接收到用户请求, 并且用户未被鉴权时, 用户会被重定向到配置好的登录页面. 你需要通过配置选项中的 UserInteraction 来配置登录页. 默认为 /Account/Login. 其中, 会携带 returnUrl 参数, 以告知登录页在完成登录校验后重定向到哪里.
注意: 开放重定向攻击也使用
returnUrl参数. 因此需要校验请求的 refers, 可以参考[这里](file:///C:/Users/jk/Desktop/Ids4-dosc-notes/identityserver4-latest/index.html#refinteractionservice).
Login 上下文
在登录页面, 需要获得请求上下文信息来自定义登录过程时, 可以调用 GetAuthorizationContextAsync.
jk: 似乎是需要通过注入来获得一个对象来调用该方法. 但是测试后没有返回到数据.
发布 cookie 与 claim
HttpContext 上有一个涉及鉴权的扩展方法, 用于发布鉴权的 cookie, 以及描述用户签名. 鉴权方案 (authentication scheme) 必须匹配 cookie 处理程序 (cookie handler) (参考前文).
当用户签名时, 必须至少发布 sub claim 和 name claim. IdentityServer 在 HttpContext 上提供了 SignInAsync 扩展方法来简化这一步骤.
还可以选择发布 idp claim, amr claim, 以及 auth_time claim. 若没有提供这些 claim, IdentityServer 会给定默认值.
其中:
idp声明用于标识提供者的名字.amr声明用于描述所使用的鉴权方法.auth_time声明用于标识认证的时间.
使用外部标识 Provider 来签名 (略)
Sign-in with External Identity Providers
ASP.NET Core 有一个灵活的方式来处理外部鉴权 (authentication). 这需要处理几个步骤.
注意:
如果你使用 ASP.NET Identity, 那么很多底层的操作会被隐藏. 建议看看微软的文档. 与 Identity 的快速开始.
为外部 provider 添加 鉴权处理程序
Add Authentication handlers for external providers
需要将与外部通信的协议实现在 Authentication Handler 中. 有些 provider 使用专有协议, 有些则使用标准协议.
参考快速开始中, 对接 Facebook 等 demo. 这里略.
Windows Authentication (略)
Sign-out
在 IdentityServer 上退出就和删除 Cookie 一样简单. 但是要实现联合退出 (完整的退出), 我们需要考虑登录用户的所有应用 (有时会包括上游应用).
删除鉴权 Cookie
移除鉴权 Cookie 就调用 SignOutAsync 方法, 并传入 scheme
await HttpContext.SignOutAsync(IdentityServerConstants.DefaultCookieAuthenticationScheme);
或使用 IdentityServer 提供的扩展
await HttpContext.SignOutAsync();
注意, 通常需要提示用户退出 (意味着需要 POST 请求). 这样避免攻击, 使得用户不小心退出.