postMessage() 和 message 事件
https://developer.mozilla.org/zh-CN/docs/Web/API/Window/postMessage
参考代码:
通过网盘分享的文件:postmessage-demo.7z 链接: https://pan.baidu.com/s/1skF0hvowHOgf0MoM3eVc0w?pwd=idw6 提取码: idw6
通常因为同源策略, 两个不同的页面中的 JavaScript 无法进行互相通信.
1. 用法说明
基本模型:

基本用法:
- 在
Page1中获得Page2的Window引用 (targetWindow). - 通过
targetWindow调用postMessage()来发送消息. - 在
Page2中注册message事件.
当在 Page1 中, 利用 targetWindow.postMessage() 发送消息时, 会触发 Page2 中的 message 事件.
注意事项:
postMessage()方法签名:otherWindow.postMessage(message, targetOrigin[, transfer])message参数是结构化数据, 可以是对象和基本数据类型.targetOrigin用于安全控制, 可以是主机名, 也可以是'*', 表示哪个站点可以接收该消息.
- 通常, 在
Page1中是通过iframe或window.open()来获得Page2的引用.- 例如:
const targetWindow = window.open('...') - 或者:
const targetWindow = iframe.contentWindow
- 例如:
- 从
Page1发送消息给Page2, 还需要确保Page2能正常加载. 所以一般会考虑延迟执行postMessage.
一句话概述: 在当前页面中, 获得其他页面的引用, 使用该引用调用
postMessage(), 在另一个页面中注册message事件, 来接收postMessage的消息.
2. 基于 Vue + AntdVue 的案例
demo 使用
AntdVue, 可以使用页面组件, 效果会好一些.
基本步骤:
- 准备两个项目, 然后安装
antdVue以及相关组件. - 配置固定
host和port. - 在主页中利用
ref引用iframe, 来获得contentWindow. 并调用postMessage(). - 需要注意延时, 确保目标网站已经加载完成, 来保证目标页面注册了
message事件. - 在目标站点注册
message事件.
2.1 详细步骤分解 - 前期准备
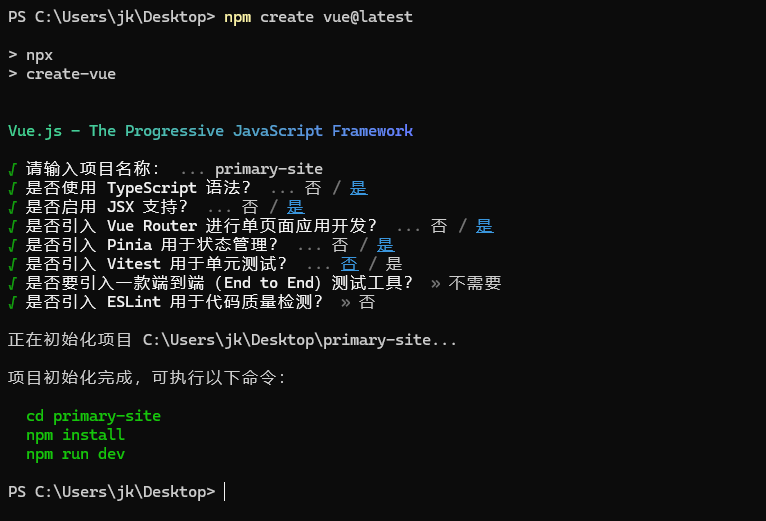
2.1.1 创建两个项目
npm create vue@latest
项目名可以使用 primary-site 和 secondary-site
使用
TS,JSX,Router,Pinia
然后创建工作区 (使用 VSCode) 来维护代码.
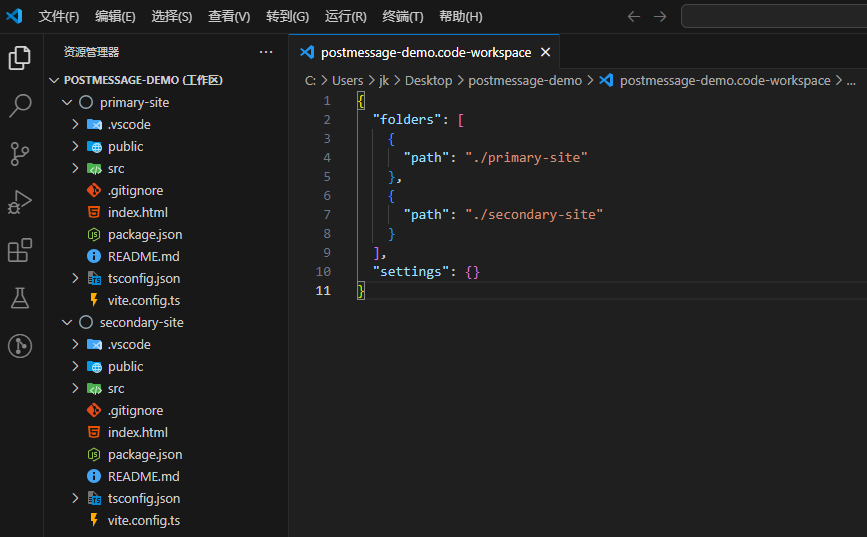
进入项目后安装必要依赖 (npm i), 然后删除原有的页面与组件. 移除默认的样式文件. 必要时, 使用 git 维护.
npm i
git init
git add .
git commit -m 'init'
2.2.2 清理项目模板中的文件
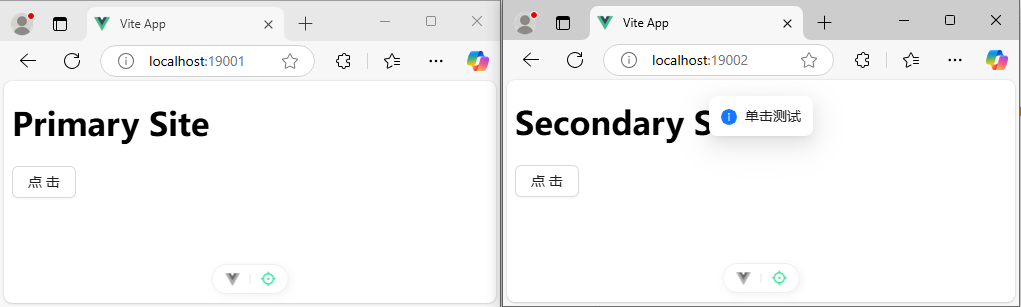
以
primary-site项目为例
- 移除
src/components目录下的所有文件. - 修改
App.vue中的模板, 只保留RouterView组件, 并移除导入的组件 (避免报错). 同时删除样式代码. - 删除
src/views目录下的所有文件, 重新创建Index.vue文件. 并添加一些提示文字作为标识. - 删除
src/store中的文件, 删除main.ts文件中引入的css文件. - 修改
vite.config.ts文件, 编辑站点的server.port. - 修改
src/router/index.ts文件, 移除所有路由, 以及导入的组件. 重新定义路由指向src/views/Index.ts.
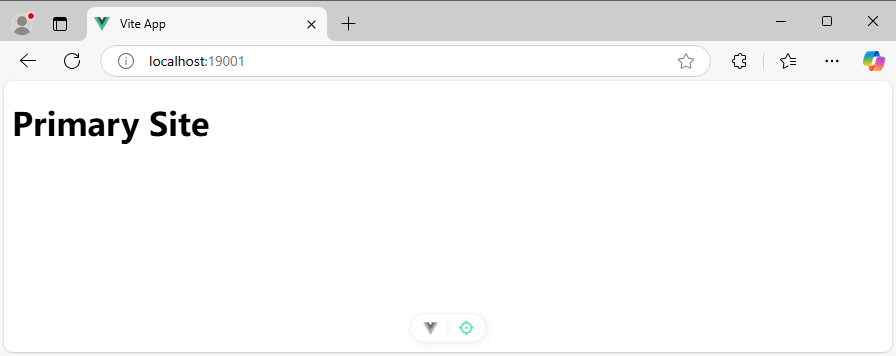
最后运行项目: npm run dev
secondary-site 也同样处理.
至此完成前期准备工作.
2.2.3 安装必要的模块
需要安装 antdVue 相关模块, 安装 dayjs, 安装 sass 等.
npm install ant-design-vue@4.x -S
npm install unplugin-vue-components -D
npm install dayjs -S
npm install sass -D
npm install debug -S
npm install @types/debug -D
修改 vite.config.ts 来使用按需加载
import { defineConfig } from 'vite';
import Components from 'unplugin-vue-components/vite';
import { AntDesignVueResolver } from 'unplugin-vue-components/resolvers';
export default defineConfig({
  plugins: [
    // ...
    Components({
      resolvers: [
        AntDesignVueResolver({
          importStyle: false, // css in js
        }),
      ],
    }),
  ],
});
修改 src/views/Index.vue 验证组件
<template>
  <h1>Primary Site</h1>
  <Space>
    <Button @click="clickHandler">点击</Button>
  </Space>
</template>

<script lang="ts" setup>
import {
  Button,
  message,
  Space,
} from 'ant-design-vue'

const clickHandler = () => {
  message.info('单击测试')
}
</script>

<style lang="scss" scoped>
</style>
修改 src/App.vue 文件, 使用 ConfigProvider 来启用中文支持.
<script setup lang="ts">
import { RouterView } from 'vue-router'
import { ConfigProvider } from 'ant-design-vue'
import zhCN from 'ant-design-vue/es/locale/zh_CN';
import dayjs from 'dayjs';
import 'dayjs/locale/zh-cn';
dayjs.locale('zh-cn');
</script>

<template>
  <ConfigProvider :locale="zhCN">
    <RouterView />
  </ConfigProvider>
</template>

<style scoped>
</style>
在 src/main.ts 文件中添加代码:
// main.ts
...

if (!window.localStorage.getItem('debug')) {
  window.localStorage.setItem('debug', 'debug:*')
}
在页面中加载 debug 模块:
import debug from 'debug'
import { onMounted } from 'vue'
const log = debug('debug:primary-site:@/views/Index.vue')
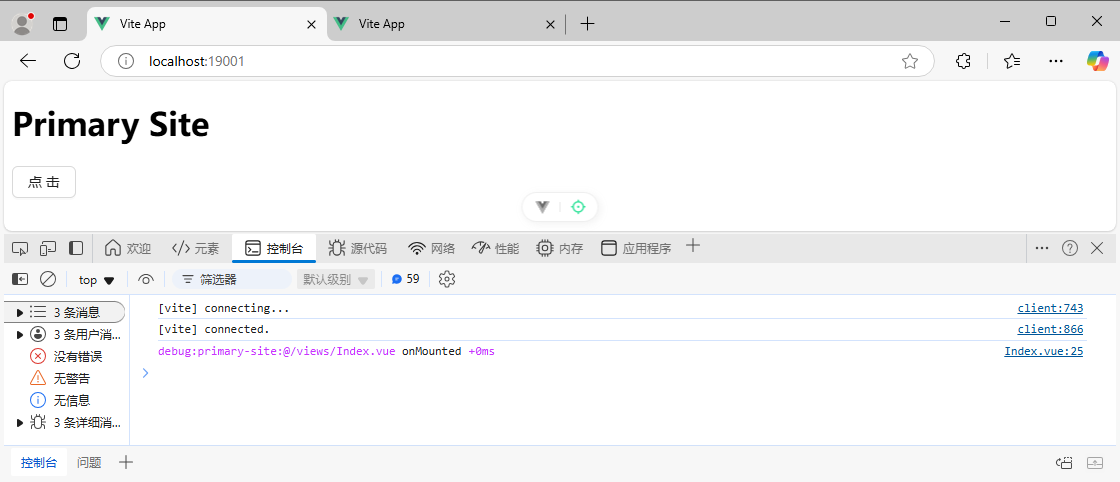
onMounted(() => {
log('onMounted')
})
2.2 详细步骤分解 - 收发消息
在 primary-site 中通过 iframe 来引用 secondary-site 中的页面. 然后调用 postMessage 发送消息.
处理步骤:
- 在
secondary-site对应页面中注册message事件. 需要注意组件生命周期, 在对应阶段移除事件. - 在
primary-site中定义Modal组件, 在组件中嵌入iframe, 并引用secondary-site页面. - 并在激活模态框后, 通过
iframe的contentWindow来调用postMessage方法, 来发送消息.
2.2.1 在 secondary-site 中注册 message 事件
<template>
  <h1>Secondary Site</h1>
</template>

<script lang="ts" setup>
import debug from 'debug'
import { onMounted, onUnmounted } from 'vue'
const log = debug('debug:secondary-site:@/views/Index.vue')

function receiveMessage(e: MessageEvent) {
  log('receiveMessage: %O', e)
}

onMounted(() => {
  log('onMounted')
  window.addEventListener('message', receiveMessage)
})

onUnmounted(() => {
  log('onUnmounted')
  window.removeEventListener('message', receiveMessage)
})
</script>

<style lang="scss" scoped>
</style>
2.2.2 在 primary-site 页面中使用 Modal
<template>
  <h1>Primary Site</h1>
  <Space>
    <Button @click="openModalHandler">弹出模态框</Button>
  </Space>

  <Modal title="引用另一个站点" :footer="null" v-model:open="openModalStatus">
    <iframe ref="iframeRef" class="iframe-class"></iframe>
  </Modal>
</template>

<script lang="ts" setup>
import {
  Button,
  Space,
  Modal,
} from 'ant-design-vue'

import debug from 'debug'
import { ref } from 'vue';
const log = debug('debug:primary-site:@/views/Index.vue')

const openModalStatus = ref<boolean>(false)
const iframeRef = ref<HTMLIFrameElement>()

const openModalHandler = () => {
  log('打开模态框: %O', iframeRef.value)
  openModalStatus.value = true
}

</script>

<style lang="scss" scoped>
.iframe-class {
  width: 100%;
  height: 5rem;
  background: #eaeaea;
  border-width: 0;
}
</style>

需要注意的是:
- 设置模态框显示后, 要使用
nextTick才能确保iframeRef引用绑定到iframe标签上. Modal有一个属性forceRender来控制什么时候加载模态框的DOM节点.- 当
:forceRender="true"时, 无论Modal是否加载, 都会渲染 该组件, 以及其中的元素. 这对iframeRef的绑定更加容易控制. - 当
:forceRender="false"时, 只有在显示Modal时才会渲染对应的DOM的元素. 因此在iframeRef绑定时需要使用nextTick.
- 当
例如代码:
<template>
<h1>Primary Site</h1>
<Space>
<Button @click="openModalHandler">弹出模态框</Button>
</Space>
<Modal title="引用另一个站点"
v-model:open="openModalStatus"
:footer="null"
:force-render="true"
>
<iframe ref="iframeRef" class="iframe-class"></iframe>
</Modal>
</template>
<script lang="ts" setup>
import {
Button,
Space,
Modal,
} from 'ant-design-vue'
import debug from 'debug'
import { nextTick, ref } from 'vue';
const log = debug('debug:primary-site:@/views/Index.vue')
const openModalStatus = ref<boolean>(false)
const iframeRef = ref<HTMLIFrameElement>()
const openModalHandler = () => {
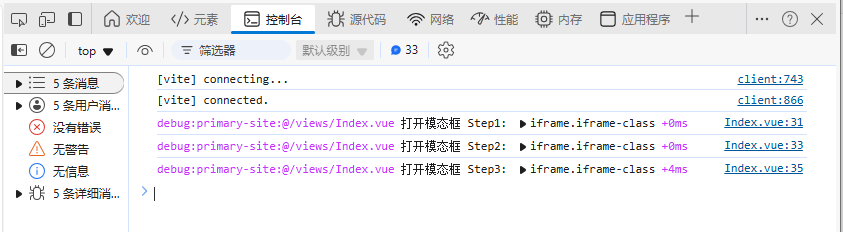
log('打开模态框 Step1: %O', iframeRef.value)
openModalStatus.value = true
log('打开模态框 Step2: %O', iframeRef.value)
nextTick(() => {
log('打开模态框 Step3: %O', iframeRef.value)
})
}
</script>
<style lang="scss" scoped>
.iframe-class {
width: 100%;
height: 5rem;
background: #eaeaea;
border-width: 0;
}
</style>
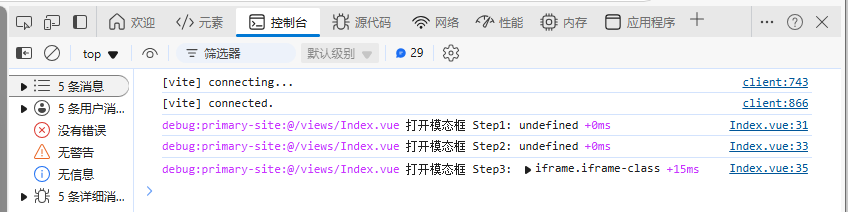
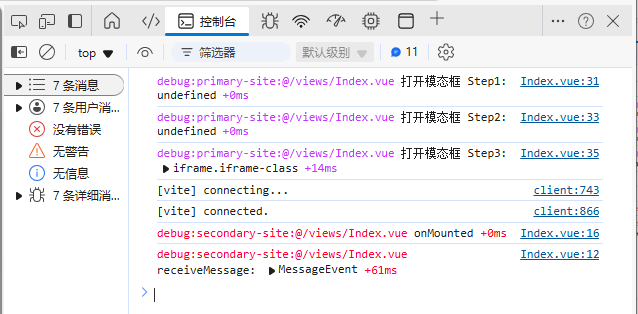
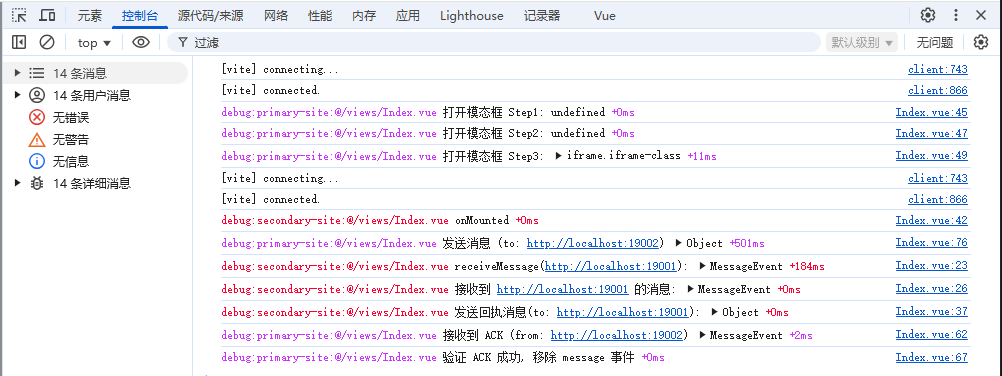
打开模态框后的日志为:
修改 :force-render="false" 后:
<template>
  ...
  <Modal title="引用另一个站点"
    v-model:open="openModalStatus"
    :footer="null"
    :force-render="false"
  >
    <iframe ref="iframeRef" class="iframe-class"></iframe>
  </Modal>
</template>
<script lang="ts" setup>
...
const openModalHandler = () => {
  log('打开模态框 Step1: %O', iframeRef.value)
  openModalStatus.value = true
  log('打开模态框 Step2: %O', iframeRef.value)
  nextTick(() => {
    log('打开模态框 Step3: %O', iframeRef.value)
  })
}
</script>
2.2.3 在打开模态框时发送消息
利用 iframeRef 实例的 contentWindow 来获得目标页面的 Window 引用, 然后调用 postMessage 发送消息.
步骤:
- 在
iframe中添加src属性, 来引用目标页面. - 在打开模态框的方法中, 利用
iframeRef.value.contentWidow来获得目标页面的window, 来发送消息.
需要注意的是: Modal 框的加载时期, 加载 iframe 中的指定页面后才能发送消息, 必须确保目标页面注册了 message 事件. 所以如果模态框使用了 :force-render="false", 发送消息的代码需要写在 setTimeout 中, 暂定 500 毫秒. 但是如果使用 :force-render="true", 那么就可以直接发送消息.
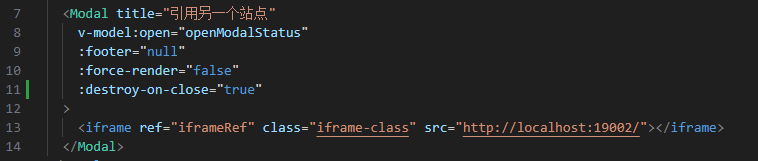
:force-render="false"
<template>
  <h1>Primary Site</h1>
  <Space>
    <Button @click="openModalHandler">弹出模态框</Button>
  </Space>

  <Modal title="引用另一个站点"
    v-model:open="openModalStatus"
    :footer="null"
    :force-render="false"
  >
    <iframe ref="iframeRef" class="iframe-class" src="http://localhost:19002/">
    </iframe>
  </Modal>
</template>

<script lang="ts" setup>
import {
  Button,
  Space,
  Modal,
} from 'ant-design-vue'

import debug from 'debug'
import { nextTick, ref } from 'vue';
const log = debug('debug:primary-site:@/views/Index.vue')

const openModalStatus = ref<boolean>(false)
const iframeRef = ref<HTMLIFrameElement>()

const openModalHandler = () => {
  log('打开模态框 Step1: %O', iframeRef.value)
  openModalStatus.value = true
  log('打开模态框 Step2: %O', iframeRef.value)
  nextTick(() => {
    log('打开模态框 Step3: %O', iframeRef.value)

    setTimeout(() => {
      iframeRef.value?.contentWindow?.postMessage('发送消息', '*')
    }, 500)

  })
}
</script>

<style lang="scss" scoped>
.iframe-class {
  width: 100%;
  height: 5rem;
  background: #eaeaea;
  border-width: 0;
}
</style>
:force-render="true"
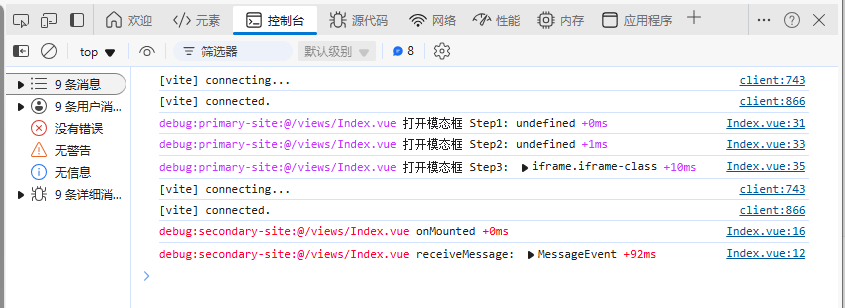
由于预先渲染了 iframe, 在显示模态框之前, 目标页面就已经加载完成.
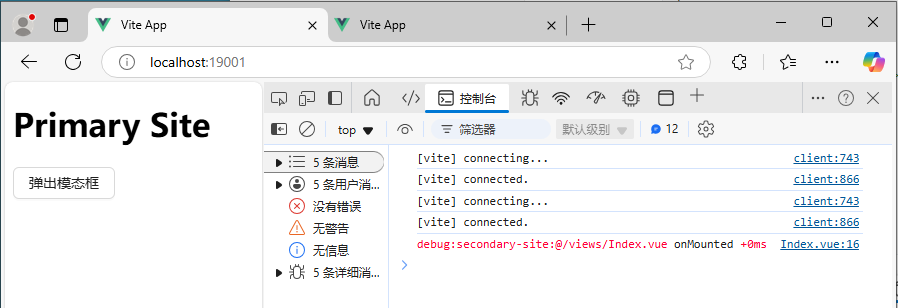
可以看到页面加载完成, 就会自动执行 secondary-site 中的 onMounted 方法.
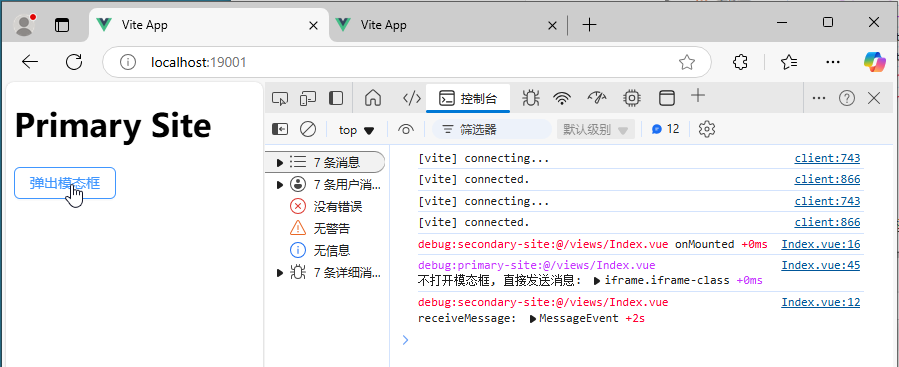
此时极端点, 即使不显示模态框, 就可以直接发送消息:
const openModalHandler = () => {
  log('不打开模态框, 直接发送消息: %O', iframeRef.value)
  iframeRef.value?.contentWindow?.postMessage('发送消息', '*')
}
2.3 详细步骤分解 - 补充说明
为了安全, 实际开发中, 会在发送消息时, 指定可以接收消息的域名信息. 同时在目标站点上接收消息时, 需要验证消息的来源. 主要的操作有两个方向:
- 目标页面. 需要注册
message事件, 该事件不会阻塞, 凡是接收到消息都会触发该事件. 但是事件参数有一个属性origin, 它存储了消息源的host信息, 可用于筛选响应. - 源页面. 在源页面中调用
postMessage方法的第二个参数, 用于指定那个域名下的页面可以接收到该消息. 如果不舍限制可以使用'*'.
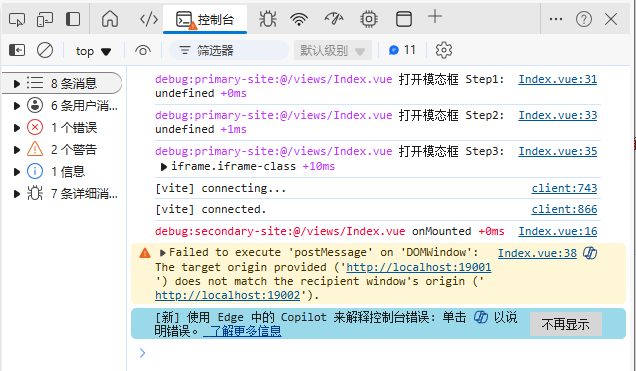
例如: secondary-site 的域名是 http://localhost:19002, 那么在 primary-site 中只有设置 '*' 或 'http://localhost:19002' 才可以将消息发出, 并被响应.
const openModalHandler = () => {
  log('打开模态框 Step1: %O', iframeRef.value)
  openModalStatus.value = true
  log('打开模态框 Step2: %O', iframeRef.value)
  nextTick(() => {
    log('打开模态框 Step3: %O', iframeRef.value)

    setTimeout(() => {
      iframeRef.value?.contentWindow?.postMessage('发送消息', 'http://localhost:19002')
    }, 500)

  })
}
但是如果省略了该参数, 或修改为其他, 就会被浏览器拦截掉.
const openModalHandler = () => {
  log('打开模态框 Step1: %O', iframeRef.value)
  openModalStatus.value = true
  log('打开模态框 Step2: %O', iframeRef.value)
  nextTick(() => {
    log('打开模态框 Step3: %O', iframeRef.value)

    setTimeout(() => {
      iframeRef.value?.contentWindow?.postMessage('发送消息', 'http://localhost:19001')
    }, 500)

  })
}
因此在实际开发中, 应该控制这两个位置, 来确保数据的收发是安全的.
2.3.1 在目标 message 事件中过滤源
message 事件参数中有三个常用属性
data属性, 记录发送的消息. 新浏览器支持结构化参数, 即JSON对象, 但是较老的浏览器不支持. 因此实际开发中, 建议传输字符串. 使用JSON.parse()和JSON.stringify()来处理数据.origin属性, 存储消息源. 即那个网站发送的消息. 基本格式是:协议://主机:端口.source属性, 引用发送消息方.WindowProxy类型, 用来向消息发起方法发送消息.
结合配置文件, 可以在项目中过滤出 origin
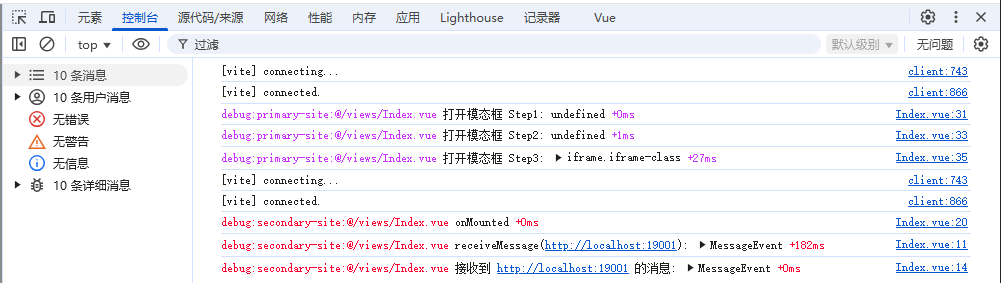
function receiveMessage(e: MessageEvent) {
  log('receiveMessage(%s): %O', e.origin, e)

  if (e.origin === 'http://localhost:19001') {
    log('接收到 http://localhost:19001 的消息: %O', e)
    // 处理消息
  }
}
可以拷贝一份 primary-site (19003), 启动后给 secondary-site 发送消息查看.
- 修改文件名
primary-site-ext, 注意修改package.json文件中的name属性. - 修改
vite.config.ts中的port为19003. - 然后修改
src/views/Index.vue中的名字, 以供显示区别.
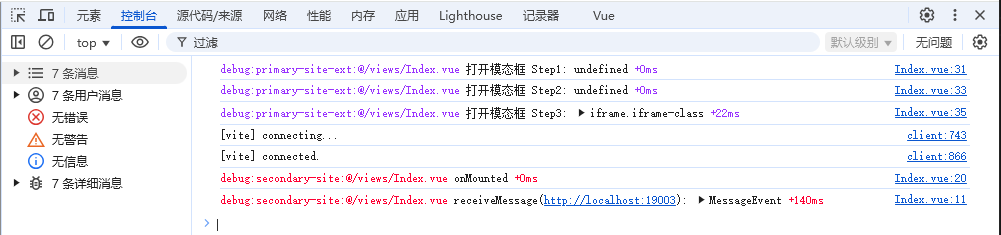
可见消息已被接收, 但是没有通过 if 判断, 所以不处理该消息.
注意
在实际开发中, 一般会有 开发环境, 测试环境, 预发环境, 以及生产环境等. 利用 配置文件, 可以对其进行配置.
2.3.2 ACK
为了保证消息完成发送, 应该在消息接收时发送一个回执, 来告知消息发送方消息已送达.
即 Page1 中发送消息给 Page2, Page2 应该回执给 Page1 消息收到. 因此需要在 Page1 中也注册 message 事件, 另外在 Page2 中接收到消息后, 给消息源发送 ACK 消息. 同时为了保证消息的准确性, 还需要为消息提供唯一标识, 以供验证. 为了区分正常消息, 和 ACK 消息, 还需要定义消息类型.
2.3.2.1 首先定义消息类型
enum MessageType {
  ACK,
  Normal
}

interface PostMessage<T = any> {
  msgId: string | number;
  msgType: MessageType;
  data?: T
}
2.3.2.2 目标站点返回 ACK 消息
function receiveMessage(e: MessageEvent<PostMessage>) {
  log('receiveMessage(%s): %O', e.origin, e)

  if (e.origin === 'http://localhost:19001'
      && e.data?.msgType == MessageType.Normal
  ) {
    log('接收到 http://localhost:19001 的消息: %O', e)
    // 处理消息
    // ...

    // 回执
    const srcWindow = e.source as WindowProxy
    const ack: PostMessage = {
      msgId: e.data.msgId,
      msgType: MessageType.ACK,
    }
    srcWindow.postMessage(ack, e.origin)
    log('发送回执消息(to: %s): %O', e.origin, ack)
  }
}
2.3.2.3 发送消息时注册 message 事件
setTimeout(() => {
  const msgId = +new Date()
  const data: PostMessage = {
    msgId,
    msgType: MessageType.Normal,
    data: {
      content: '消息内容'
    }
  }

  function ackReceive (e: MessageEvent<PostMessage>) {
    log('接收到 ACK (from: %s) %O', e.origin, e)
    if (e.origin == 'http://localhost:19002'
        && e.data.msgId == msgId
        && e.data.msgType == MessageType.ACK
       ) {
      log('验证 ACK 成功, 移除 message 事件')
      window.removeEventListener('message', ackReceive)
    } else {
      log('验证 ACK 失败')
    }
  }
  window.addEventListener('message', ackReceive)

  iframeRef.value?.contentWindow?.postMessage(data, 'http://localhost:19002')
  log('发送消息 (to: http://localhost:19002) %O', data)
}, 500)
2.3.2.4 重复发送
由于网络环境等问题, 无法确保目标站点加载时机, 因此在发送消息时, 仅仅等待 500 毫秒不合适. 所以可以考虑每隔 1 秒钟发送一次请求, 如果成功则不再发送, 如此重复指定次数, 最终失败则抛出异常.
这里需要一个延迟循环的操作, 可以考虑使用 setTimeout 方法.
let retries = 5
function sendMessage(message, origin) {
  retries--
  if (retries <= 0) 消息发送失败
  window.postMessage(message, origin)
  setTimeout(sendMessage, 1000)
}
同时在消息成功发送, 并获得回执后, 应停止继续发送消息.
let retries = 5
let confirm = false
function sendMessage(message, origin) {
  retries--
  if (confirm == true) return
  if (retries <= 0) 消息发送失败
  window.postMessage(message, origin)
  setTimeout(sendMessage, 1000)
}
整理后代码可以修改为:
const openModalHandler = () => {
log('打开模态框 Step1: %O', iframeRef.value)
openModalStatus.value = true
log('打开模态框 Step2: %O', iframeRef.value)
nextTick(() => {
log('打开模态框 Step3: %O', iframeRef.value)
const msgId = +new Date()
const data: PostMessage = {
msgId,
msgType: MessageType.Normal,
data: {
content: '消息内容'
}
}
let _retries = 5
let _confirm = false
function ackReceive (e: MessageEvent<PostMessage>) {
log('接收到 ACK (from: %s) %O', e.origin, e)
if (e.origin == 'http://localhost:19002'
&& e.data.msgId == msgId
&& e.data.msgType == MessageType.ACK
) {
log('验证 ACK 成功, 移除 message 事件')
window.removeEventListener('message', ackReceive)
_confirm = true
} else {
log('验证 ACK 失败')
}
}
window.addEventListener('message', ackReceive)
function sendMessage(message: PostMessage, origin: string) {
if (_confirm == true) return
_retries--
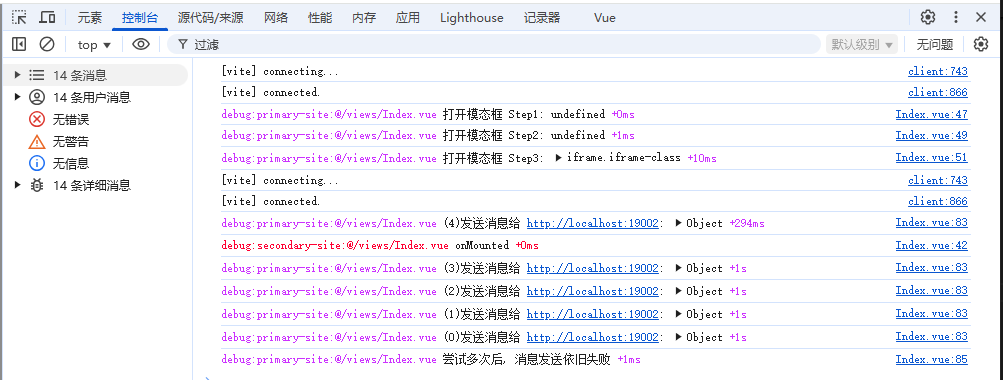
log('(%s)发送消息给 %s: %O', _retries, origin, message)
if (_retries <= 0) {
log('尝试多次后, 消息发送依旧失败')
return
}
iframeRef.value?.contentWindow?.postMessage(message, origin)
setTimeout(() => sendMessage(message, origin), 1000)
}
iframeRef.value?.addEventListener('load', () => {
sendMessage(data, 'http://localhost:19002')
})
})
}
测试运行
这里移除了保证 secondary-site 加载预留的 500 毫秒等待, 因此将 sendMessage 放在 iframe 的 load 事件中. 但是该方式存在一个问题, 即二次弹窗后, 不再触发 load 事件, 则会导致不会发送对一个消息. 这一点根据需求俩确定是否需要二次触发. 亦或者在 Modal 组件中配置关闭模态框时清除所有元素, 这样再次开启模态框时就会触发 load 事件了.
实际上逻辑也应如此, 如果缓存了 iframe 引用的页面, 二次打开的时候未新创建页面, 也无需再次发送初始化消息, 出发每次都需要发送消息, 可以考虑其他技术方案. 也可以判断是否为新开或二开, 分别使用 load 事件, 或直接调用. 这一点与 Modal 组件的 :destroy-on-close 配合设置.

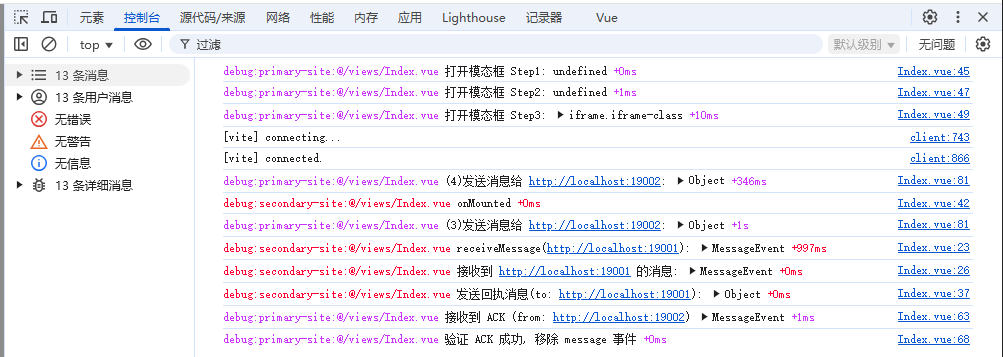
二次打开的日志记录
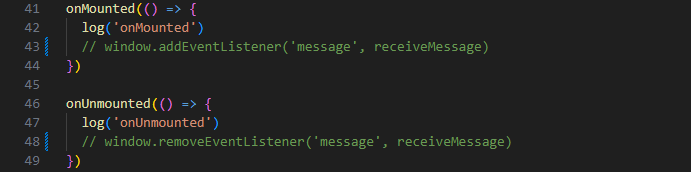
然后移除 secondary-site 中注册的事件, 再测试
3. 封装
类型定义
enum MessageType {
  ACK,
  Normal
}

interface PostMessage<T = any> {
  msgId: string | number;
  msgType: MessageType;
  data?: T
}

interface PostMessageOptions {
  targetWindow: WindowProxy;
  origin?: string;
  retries?: number;
  waitTime?: number;
}
定义消息发送方法
function postMessageFn<T = any>(message: T, opts: PostMessageOptions) {
log('postMessageFn: %O, %O', message, opts)
let tries = opts.retries ?? 5
let timespan = opts.waitTime ?? 1000
let confirm = false
const origin = opts.origin ?? '*'
const msgId = +new Date
const data: PostMessage<T> = {
msgId: msgId,
msgType: MessageType.Normal,
data: message
}
function sendMessage() {
if (confirm) return
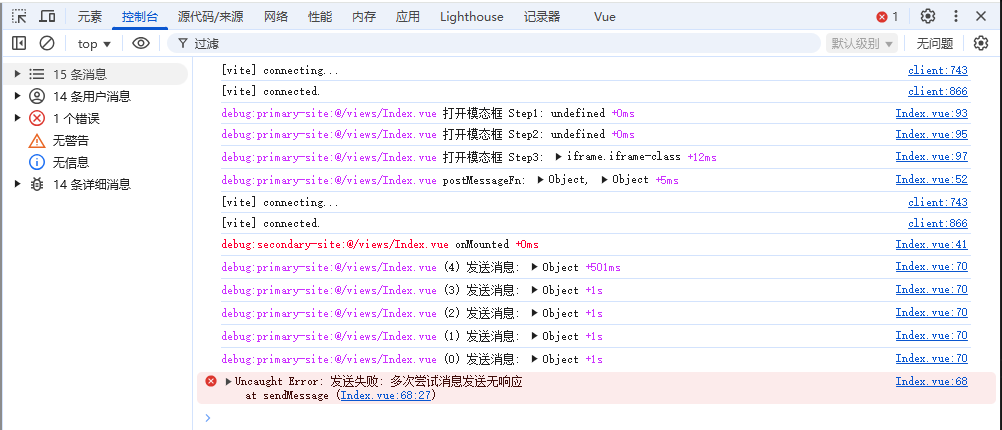
if (tries <= 0) throw new Error('发送失败: 多次尝试消息发送无响应')
tries--
log('(%s) 发送消息: %O', tries, data)
opts.targetWindow.postMessage(data, origin)
setTimeout(sendMessage, timespan)
}
function ackReceive(e: MessageEvent<PostMessage>) {
log('ackReceive: %O', e)
if ((origin !== '*' && e.origin == origin || true)
&& e.data.msgId == msgId
&& e.data.msgType == MessageType.ACK
) {
window.removeEventListener('message', ackReceive)
confirm = true
}
}
window.addEventListener('message', ackReceive)
setTimeout(sendMessage, 500)
}
执行消息发送
const openModalHandler = () => {
  log('打开模态框 Step1: %O', iframeRef.value)
  openModalStatus.value = true
  log('打开模态框 Step2: %O', iframeRef.value)
  nextTick(() => {
    log('打开模态框 Step3: %O', iframeRef.value)

    if(iframeRef.value) {
      postMessageFn({
        content: '发送的消息'
      }, {
        targetWindow: iframeRef.value.contentWindow as WindowProxy
      })
    }
  })
}
目标网站的代码为 (未封装)
enum MessageType {
  ACK,
  Normal
}

interface PostMessage<T = any> {
  msgId: string | number;
  msgType: MessageType;
  data?: T
}

function receiveMessage(e: MessageEvent<PostMessage>) {
  log('receiveMessage(%s): %O', e.origin, e)

  if (e.origin === 'http://localhost:19001' && e.data?.msgType == MessageType.Normal) {
    log('接收到 http://localhost:19001 的消息: %O', e)
    // 处理消息
    // ...

    // 回执
    const srcWindow = e.source as WindowProxy
    const ack: PostMessage = {
      msgId: e.data.msgId,
      msgType: MessageType.ACK,
    }
    srcWindow.postMessage(ack, e.origin)
    log('发送回执消息(to: %s): %O', e.origin, ack)
  }
}

onMounted(() => {
  log('onMounted')
  window.addEventListener('message', receiveMessage)
})

onUnmounted(() => {
  log('onUnmounted')
  window.removeEventListener('message', receiveMessage)
})
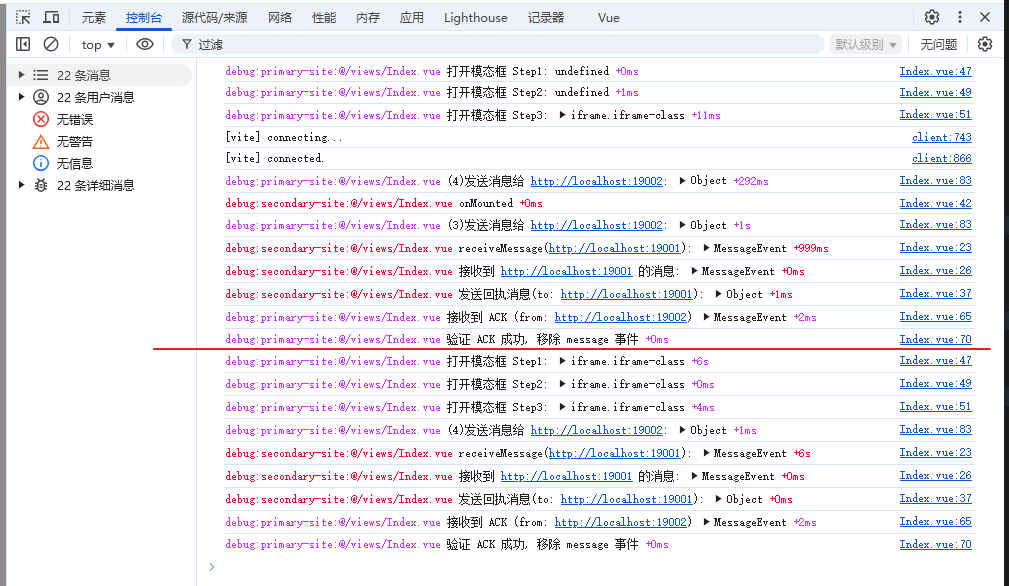
运行结果为

如果将目标站点的 message 事件移除再测试