从代码创建数据库
至此, 我们已经创建了实体, 以及它的元数据来指示 Entity Framework Core 5 要创建什么. 如你将要看到的, 使用这些指令的过程, 以及这些指令指示 Entity Framework Core 5 来创建数据库, 与在 Visual Studio 中创建初始化迁移, 以及运行迁移一样简单. 本书中, 我们将在 Entity Framework Core 中主要使用 Microsoft SQL Server provider, 因此我们会创建 SQL Server 数据库.
设置连接字符串
在 Entity Framework Core 5 中利用代码来创建数据库的第一步, 便是在应用程序中定义连接字符串. 打开 ASP.NET Core web 应用的 appsettings.json 文件. 然后, 我们使用 ConnectionStrings 属性来添加连接字符串, 该字符串会在我们的 app 中使用. 在我们的 app 中, 我们会使用名为 "connection" 的连接字符串, 并且它将指向名为 "EfCore5WebApp" 的 SQL 数据库. 如下所示:
{
  "Logging": {
    "LogLevel": {
      "Default": "Information",
      "Microsoft": "Warning",
      "Microsoft.Hosting.Lifetime": "Information"
    }
  },
  "AllowedHosts": "*",
  "ConnectionStrings": {
    "connection": "Server=(localdb)\\mssqllocaldb;Database=EfCore5WebApp;Trusted_Connection=True;MultipleActiveResultSets=true"
  }
}
上面的案例是连接到本地 SQL Server 数据库. 你可以从连接字符串看到其包含文本 "(localdb)". 现在已设置连接字符串, 我们需要告诉我们的应用程序去使用这个链接字符串. 打开 Startup.cs 类文件. 在 ConfigureServices 方法中, 我们使用 AddDbContext() 方法去连接到 SQL Server, 如下面代码为例:
public void ConfigureServices(IServiceCollection services)
{
    services.AddControllersWithViews();
    services.AddDbContext<AppDbContext>(options =>
        options.UseSqlServer(Configuration.GetConnectionString("connection")));
}
注意不能使用 .NET 6 的代码, .NET 6 的 MVC 代码结构与 Core 3 不太一样.
.NET 6 的结构使用 MINIAPI 的模型.
我们使用 "UseSqlServer" 扩展方法, 该方法包含在 Entity Framework Core 5 SQL NuGet 包中. 你的 Startup.cs 类文件应该看起来是这样的:
using EFCore5WebApp.DAL;
using Microsoft.AspNetCore.Builder;
using Microsoft.AspNetCore.Hosting;
using Microsoft.EntityFrameworkCore;
using Microsoft.Extensions.Configuration;
using Microsoft.Extensions.DependencyInjection;
using Microsoft.Extensions.Hosting;
using System;
using System.Collections.Generic;
using System.Linq;
using System.Threading.Tasks;

namespace EFCore5WebApp
{
    public class Startup
    {
        public Startup(IConfiguration configuration)
        {
            Configuration = configuration;
        }

        public IConfiguration Configuration { get; }

        // This method gets called by the runtime. Use this method to add services to the container.
        public void ConfigureServices(IServiceCollection services)
        {
            services.AddControllersWithViews();

            services.AddDbContext<AppDbContext>(options =>
                options.UseSqlServer(Configuration.GetConnectionString("connection")));
        }

        // This method gets called by the runtime. Use this method to configure the HTTP request pipeline.
        public void Configure(IApplicationBuilder app, IWebHostEnvironment env)
        {
            if (env.IsDevelopment())
            {
                app.UseDeveloperExceptionPage();
            }
            else
            {
                app.UseExceptionHandler("/Home/Error");
            }
            app.UseStaticFiles();

            app.UseRouting();

            app.UseAuthorization();

            app.UseEndpoints(endpoints =>
            {
                endpoints.MapControllerRoute(
                    name: "default",
                    pattern: "{controller=Home}/{action=Index}/{id?}");
            });
        }
    }
}
现在我们的应用程序已经指向了数据库, 我们可以通过添加一个迁移来真正地创建数据库了.
创建初始化迁移 (Initial Migration)
在 Entity Framework Core 5 中通过代码来创建数据库的下一个步骤便是创建一个初始化迁移.
要创建初始化迁移, 我们可以使用 NuGet 包管理器控制台, 并运行 "Add-Migration" 命令, 并将迁移的名字作为第二个参数传入命令中.
现在, 我们创建初始化迁移, 并命名为 "InitialCreate". 打开 NuGet 包管理器控制台, 并修改默认项目的下拉列表到 DAL 项目. 并运行下面命令: "Add-Migration InitialCreate". 同时确保你的 Web 项目设置为解决方案中的启动项.

现在, 你可以看到一个 Migrations 文件夹添加到 DAL 项目中, 并创建了迁移类文件, 如图所示:
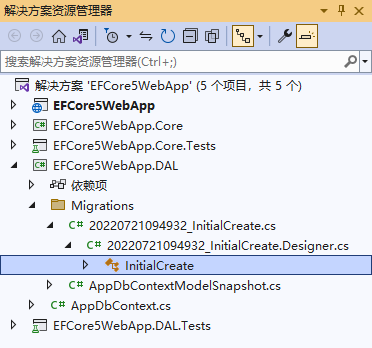
现在你可以看到一个名为 InitialCreate 类文件, 它是由 "Add-Migration" 命令所创建, 该文件看起来像:
using Microsoft.EntityFrameworkCore.Migrations;

namespace EFCore5WebApp.DAL.Migrations
{
    public partial class InitialCreate : Migration
    {
        protected override void Up(MigrationBuilder migrationBuilder)
        {
            migrationBuilder.CreateTable(
                name: "LookUps",
                columns: table => new
                {
                    Code = table.Column<string>(type: "nvarchar(450)", nullable: false),
                    Description = table.Column<string>(type: "nvarchar(max)", nullable: true),
                    LookUpType = table.Column<int>(type: "int", nullable: false)
                },
                constraints: table =>
                {
                    table.PrimaryKey("PK_LookUps", x => x.Code);
                });

            migrationBuilder.CreateTable(
                name: "Persons",
                columns: table => new
                {
                    Id = table.Column<int>(type: "int", nullable: false)
                        .Annotation("SqlServer:Identity", "1, 1"),
                    FirstName = table.Column<string>(type: "nvarchar(255)", maxLength: 255, nullable: false),
                    LastName = table.Column<string>(type: "nvarchar(255)", maxLength: 255, nullable: false),
                    EmailAddress = table.Column<string>(type: "nvarchar(max)", nullable: false)
                },
                constraints: table =>
                {
                    table.PrimaryKey("PK_Persons", x => x.Id);
                });

            migrationBuilder.CreateTable(
                name: "Addresses",
                columns: table => new
                {
                    Id = table.Column<int>(type: "int", nullable: false)
                        .Annotation("SqlServer:Identity", "1, 1"),
                    AddressLine1 = table.Column<string>(type: "nvarchar(max)", nullable: true),
                    AddressLine2 = table.Column<string>(type: "nvarchar(max)", nullable: true),
                    City = table.Column<string>(type: "nvarchar(max)", nullable: true),
                    State = table.Column<string>(type: "nvarchar(max)", nullable: true),
                    Country = table.Column<string>(type: "nvarchar(max)", nullable: true),
                    ZipCode = table.Column<string>(type: "nvarchar(max)", nullable: true),
                    PersonId = table.Column<int>(type: "int", nullable: false)
                },
                constraints: table =>
                {
                    table.PrimaryKey("PK_Addresses", x => x.Id);
                    table.ForeignKey(
                        name: "FK_Addresses_Persons_PersonId",
                        column: x => x.PersonId,
                        principalTable: "Persons",
                        principalColumn: "Id",
                        onDelete: ReferentialAction.Cascade);
                });

            migrationBuilder.CreateIndex(
                name: "IX_Addresses_PersonId",
                table: "Addresses",
                column: "PersonId");
        }

        protected override void Down(MigrationBuilder migrationBuilder)
        {
            migrationBuilder.DropTable(
                name: "Addresses");

            migrationBuilder.DropTable(
                name: "LookUps");

            migrationBuilder.DropTable(
                name: "Persons");
        }
    }
}
我将在第 14 章中介绍如何理解该文件, 并深入研究迁移. 现在已经创建了迁移文件, 让我们运行并在 SQL Server 实例中创建定义在 web 项目的 appSettings.config 文件中的 EfCore5WebApp 数据库.
通过迁移创建数据库
Creating the database from the Migration
最后, 我们会通过之前创建的 "InitialCreate" 迁移来创建数据库. 打开 NuGet 包管理器控制台, 然后运行 "Update-Database" 命令, 如图所示:

无论何时, 我们在项目中添加新的迁移后, 我们都会使用命令 "Update-Database" 来更新数据库.
通过 Visual Studio 连接到新的数据库
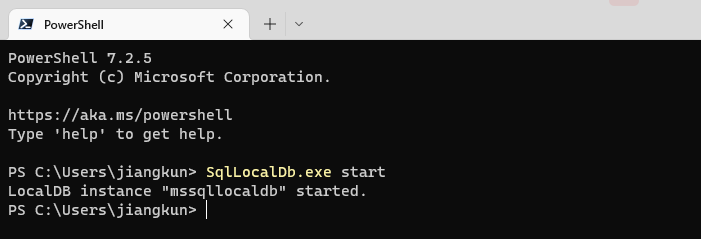
我们使用 LocalDB 作为我们的数据库, 因此, 本章我们需要按照下面步骤来操作, 用 Visual Studio 来连接到数据库. 第一步, 确认数据库已被创建. 打开命令行终端, 然后运行 "SqlLocalDB.exe start" 来启用 LocalDb 实例, 如下所示:
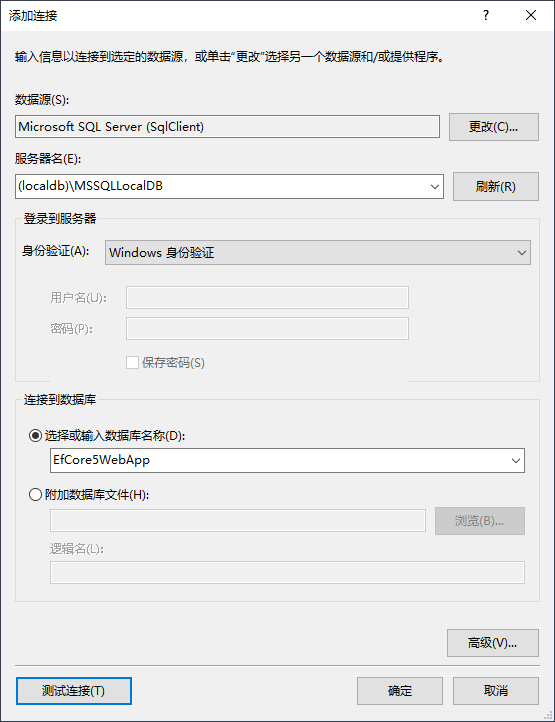
下一步, 我们使用 Visual Studio 添加一个连接到我们的 LocalDb 实例上. 依次选择工具, 连接到数据库. 如果你使用 SQL Server 或 SQL Server Express, 使用连接来代替. 连接到 LocalDb, 添加新 SQL Server 连接如图所示:
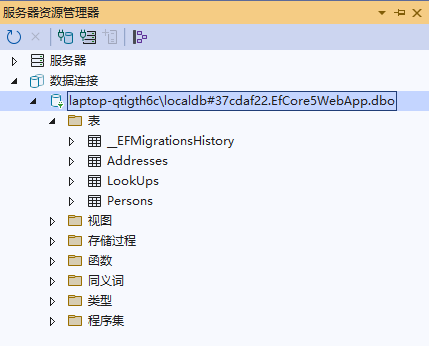
然后点击 "OK" (确定) 按钮. 现在, 你应该可以看到你新建的数据库了, 如图所示:
小结
本章中, 我们使用 Entity Framework Core 5 创建了数据库. 第一, 我们创建了连接字符串, 使用连接字符串来告诉我们的 app 如何连接到 SQL Server 数据库. 然后, 我们使用 Entity Framework 工具, "Add-Migration" 命令, 创建了迁移, 它生成创建数据库架构的所有代码. 在那之后, 我们使用 Entity Framework 工具, "Update-Database" 命令来运行迁移代码. 最后, 我们连接到我们所创建的数据库上. 在下一章里, 我们来看看如何设置新数据库的数据.