第07章 端口映射与容器互联
实际场景中, 一般是多个容器协同来完成基本任务. 因此需要在容器可以中互相访问其他容器中的程序.
7.1 端口映射实现容器访问
1. 从外部访问容器应用
当容器运行网络应用时, 要外部访问这些应用, 必须映射端口.
可以使用
-P(大写) 来随机生成端口号, 范围是49000到49900之间.可以使用
-p(小写) 来指定端口号, 一个端口仅可以绑定一个容器. 语法为IP:HostPort:ContainerPort | IP::ContainerPort | HostPort:ContainerPort
可以使用 nginx 作为案例说明
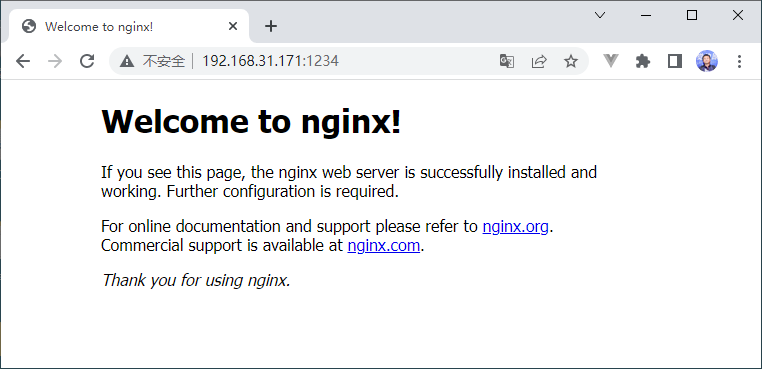
jk@jk-System-Product-Name:~$ docker run -itd -p 1234:80 nginx
Unable to find image 'nginx:latest' locally
latest: Pulling from library/nginx
a2abf6c4d29d: Pull complete
a9edb18cadd1: Pull complete
589b7251471a: Pull complete
186b1aaa4aa6: Pull complete
b4df32aa5a72: Pull complete
a0bcbecc962e: Pull complete
Digest: sha256:0d17b565c37bcbd895e9d92315a05c1c3c9a29f762b011a10c54a66cd53c9b31
Status: Downloaded newer image for nginx:latest
646f87623b563384f18bb227dd88e5aea483acf0c27678523ec5a41050da91fb
这里会从远程下载 nginx:latest, 然后以后台方式运行 (使用 -d 参数)
然后在浏览器中使用 1234 端口即可访问到 nginx 标准页面了.
2. 映射所有接口地址
若使用 -p (小写), 未指定 IP, 则会将所有 IP 进行绑定. 可以使用多个 -p (小写) 来绑定多个端口.
3. 映射到指定地址指定端口 [略]
4. 映射到制定地址的任意端口 [略]
5. 查看映射端口配置
使用 docker port 命令.
7.2 互联机制实现便捷互访
容器互联 (link) 是将多个容器关联起来的快速访问模式, 不用指定 IP 即可交互.
1. 自定义容器命名
使用 --name 可以自定义容器名, 这样便于维护与管理, 操作容器处了使用 ID, 也可以使用名字.
容器名必须唯一, 如果需要命名使用过的名字, 必须先将之前名字删除.
在使用 docker run 命令时可以使用 --rm 参数, 在容器停止是会立即删除. 注意该参数不能与 -d 合用.
2. 容器互联
使用 --link 参数可以让容器之间安全地进行交互.
基本使用步骤:
- 首先创建一个容器, 并为其设置名字, 使用
--name参数. - 然后创建一个新容器, 并带上
--link参数.--link参数语法为:--link name:alias - 连接后的容器在命名上可以通过
docker ps查看.
Docker 相当于在两个容器中间创建了虚拟通道, 不需要映射端口.
通过主机名来访问.
首先我们准备一段 nodejs 的代码, 命名为 app.js
const http = require('http');

http.createServer((req, res) => {
  console.log(req);
  res.end(JSON.stringify({
    date: Date.now(),
    status: 200,
    data: {
      url: req.url
    }
  }));
}).listen(3000);
将其放在本机的 /home/jk/node 目录下. 然后执行:
jk@jk-System-Product-Name:~/node$ docker run -d --name node -v /home/jk/node:/node node node /node/app.js
deba4c8bc3a15c5566148c2d4a1c61595de0fc987c674a8abe717c8bef7a2a9e
jk@jk-System-Product-Name:~/node$ docker run -d --link node:node --name nginx -p 80:80 nginx
dc4dfdf4243437c3493d7d6c83d3129898b138e7c797b2ea2f79b007618b6329
jk@jk-System-Product-Name:~/node$ docker ps
CONTAINER ID   IMAGE     COMMAND                  CREATED          STATUS          PORTS                               NAMES
dc4dfdf42434   nginx     "/docker-entrypoint.…"   4 seconds ago    Up 3 seconds    0.0.0.0:80->80/tcp, :::80->80/tcp   nginx
deba4c8bc3a1   node      "docker-entrypoint.s…"   21 seconds ago   Up 20 seconds                                       node
关联后的容器可以通过环境变量, 或 hosts 文件进行查看关联信息. 利用 host 来对目标机器进行访问.
进入 nginx 容器, 然后可以查看环境变量, 以及 hosts 文件.
jk@jk-System-Product-Name:~$ docker exec -it nginx /bin/bash
root@5f94fb167f23:/# env
HOSTNAME=5f94fb167f23
PWD=/
PKG_RELEASE=1~bullseye
HOME=/root
NODE_ENV_NODE_VERSION=17.3.0
NJS_VERSION=0.7.1
TERM=xterm
NODE_NAME=/nginx/node
SHLVL=1
PATH=/usr/local/sbin:/usr/local/bin:/usr/sbin:/usr/bin:/sbin:/bin
NGINX_VERSION=1.21.5
NODE_ENV_YARN_VERSION=1.22.17
_=/usr/bin/env
root@5f94fb167f23:/# cat /etc/hosts
127.0.0.1       localhost
::1     localhost ip6-localhost ip6-loopback
fe00::0 ip6-localnet
ff00::0 ip6-mcastprefix
ff02::1 ip6-allnodes
ff02::2 ip6-allrouters
172.17.0.2      node deba4c8bc3a1
172.17.0.3      5f94fb167f23
root@5f94fb167f23:/#
这里 node deba4c8bc3a1 就是 node 服务器主机.
下面利用 nginx 将 node web 服务映射到外面.
进入
nginx容器, 更新apt-get(执行apt-get update -y).安装
vim(apt-get install vim -y).编辑
nginx配置文件 (在/etc/nginx/conf.d/default.conf处).添加一段代理
location /api {
    proxy_pass http://node:3000;
    proxy_pass_header Set-cookie;
    proxy_set_header Host $host;
    proxy_set_header X-Real-IP $remote_addr;
    proxy_set_header X-Forwarded-For $proxy_add_x_forwarded_for;
}
注意这里使用 IP 有权限问题, 使用主机名即可.
检查配置, 重启
nginx$ nginx -t $ nginx -s reload
然后就可以利用 nginx 的容器访问到 node 项目了.
实际应用中, 应该使用挂载的方式挂载配置文件, 而不要子啊容器中修改配置文件.
7.3 本章小结 [略]
第08章 使用 Dockerfile 创建镜像
Dockerfile 是一个文本文件. 用于创建镜像.
8.1 基本结构
Dockerfile 内是一行行的指令, 并以 # 表示注释.
一般 Dockerfile 包含:
- 基础镜像信息
- 维护者信息
- 镜像操作指令
- 容器启动时执行的指令
一个示例
# escape=\ (backslash)
# This dockerfile uses the ubuntu:xeniel image
# VERSION 2 - EDITION 1
# Author: docker_user
# Command format: Instruction [argument / command] ..

# Base image to use, this must be set as the first line
FROM ubuntu:xeniel

# Maintainer: docker_ser <docker_user as email.com> (@docker_user)
LABEL maintainer docker_user<docker_user@email.com>

# Command to update the image
RUN echo "deb http://archive.ubuntu.com/ubuntu/ xeniel main universe" >> /etc/apt/sources.list
RUN apt-get update && apt-get install -y nginx
RUN echo "\ndaemon off;" >> /etc/nginx/nginx.conf

# Commands when creating a new container
CMD /usr/sbin/nginx
- 带有
#为注释 - 主体部分使用
FROM说明基于哪一个镜像 - 然后使用
LABEL指名维护者信息 - 然后是操作指令.
RUN指令将对镜像执行跟随指令. 每运行一条RUN指令, 镜像添加新的一层, 并提交. - 最后的
CMD指令, 来指定运行容器时的操作指令.
下面是两个实际案例.
nginx 案例
基于 debian:jessie 基础镜像, 并在其上安装 nginx 环境, 从而创建一个新的 nginx 镜像:
FROM debian:jessie

LABEL maintainer docker_user<docker_user@email.com>

ENV NGINX_VERSION 1.10.1-1~jessie

RUN apt-key adv --keyserver nkp://pgp.mit.edu:80 --recv-keys ... ... \
	&& echo "deb http://nginx.org/packages/debian/ jessie nginx" >> /etc/apt/sources.list \
	&& apt-get update \
	&& apt-get install --no-install-recommands --in-install-suggests -y \
	ca-certificates \
	nginx=${NGINX_VERSION} \
	nginx-module-xslt \
	nginx-module-geoip \
	nginx-module-image-filter \
	nginx-module-perl \
	nginx-module-njs \
	gettext-base \
	&& rm -rf /var/lib/apt/lists/*

# forward request and error logs to docker log collector
RUN ln -sf /dev/stdout /var/log/nginx/access.log \
	&& ln -sf /dev/stderr /var/log/nginx/error.log

EXPOSE 80 443

CMD ["nginx", "-g", "daemon off;"]
go 案例
基于 buildpack-deps:jessie-scm 基础镜像, 安装 GO 相关环境, 制作一个 GO 语言运行环境镜像:
FROM buildpack-deps:jessie-scm

# gcc for go
RUN apt-get update && apt-get install -y --no-install-recommand \
	g++ \
	gcc \
	libc6-dev \
	make \
	&& rm -rf /var/lib/apt/lists/*

ENV GOLANG_VERSION 1.6.3
ENV GOLANG_DOWNLOAD_URL https://golang.org/dl/go$GOLANG_VERSION.linux-amd64.tar.gz
ENV GOLANG_DOWNLOAD_SHA256 ... ...

RUN curl -fsSL "$GOLANG_DOWNLOAD_URL" -o golang.tar.gz \
	&& echo "$GOLOANG_DOWNLOAD_SHA256 golang.tar.gz" | sha256sum -C - \
	&& tar -C /usr/local -xzf golang.tar.gz \
	&& rm golang.tar.gz

ENV GOPATH /go
ENV PATH $GOPATH/bin:/usr/local/go/bin:$PATH

RUN mkdir -p "$GOPATH/src" "$GOPATH/bin" && chmod -R 777 "$GOPATH"
WORKDIR $GOPATH

COPY go-wrapper /usr/local/bin/
最终的结论是, Linux 的 Shell 基本功要扎实.
8.2 指令说明
Dockerfile 指令格式一般为 INSTRUCTION arguments. 包括配置指令, 用于配置镜像信息, 以及操作指令, 用于执行具体操作.
配置指令
| 指令 | 说明 |
|---|---|
ARG | 定义创建镜像过程中使用的变量. |
FROM | 指定所创建镜像的基础镜像. |
LABEL | 为生成的镜像生成元数据标记信息. |
EXPOSE | 声明镜像内服务监听的端口. |
ENV | 指定环境变量. |
ENTRYPOINT | 指定镜像的默认入口命令. |
VOLUME | 创建一个数据卷挂载点. |
USER | 指定运行容器时的用户名或 UID |
WORKDIR | 配置工作目录. |
ONBUILD | 创建子镜像时指定自动执行的操作指令. |
STOPSIGNAL | 指定退出的信号值. |
HELTHCHECK | 配置所启动容器如何进行健康检查. |
SHELL | 指定默认 shell 类型. |
操作指令
| 指令 | 说明 |
|---|---|
RUN | 运行指定命令. |
CMD | 启动容器时指定默认执行的命令. |
ADD | 添加内容到镜像. |
COPY | 赋值内容到镜像. |
8.2.1 配置指令
ARG
定义创建镜像过程中使用的变量.
格式: ARG <name>[=<default value>].
在指定 docker build 时, 可以使用 -build-arg[=] 来为变量赋值. 当镜像编译完成后, ARG 指定的变量不再存在. ENV 指定的变量将保留在镜像中.
Docker 内置了一些变量:
HTTP_PROXYHTTPS_PROXYFTP_PROXYNO_PROXY
FROM
用于指定基础镜像.
格式为: FROM <image>[:<tag> | @<digest>] [AS <name>]
任何 Dockerfile 文件中的第一条指令必须是 FROM 指令. 并且用一个 Dockerfile 创建多个镜像时, 可以用多个 FROM.
为了保证镜像精简, 推荐使用体积较小的镜像, 如 Alpine 或 Debian 作为基础镜像. 例如:
ARG VERSION=9.3
FROM debian:${VERSION}
LABEL
添加元数据标签. 这些信息可以用来辅助过滤出特定镜像.
格式: LABEL <key>=<value> ...
例如:
LABEL version="1.0.0-rc3"
LABEL author="yeasy@github.com" date="2020-01-01"
LABEL description="This is illustrates \
	that label-values can span multiple lines".
EXPOSE
声明镜像内服务监听的端口.
格式: EXPOSE <port> [<port>/<protocol> ...]
例如:
EXPOSE 22 80 8443
注意, 该指令只是起到声明的作用, 不会完自动完成端口映射. 如果要映射, 在启动时, 需要指定
-P参数或-p参数.
-P会自动指派宿主机的一个随机端口.
-p HOST_PORT:CONTAINER_PORT则会使用指定端口映射.
ENV
指定环境变量.
在镜像生成过程中会被后续的
RUN指令使用, 在镜像启动的容器中也会存在.
格式为: ENV <key> <value> 或 ENV <key>=<value>
例如:
ENV APP_VERSION=1.0.0
ENV APP_HOME=/usr/local/app
ENV PATH $PATH:/usr/local/bin
指定的环境变量可以在运行时替换, 只用参数 --env <key>=<value>.
注意如果一条指令为多个环境变量赋值, 且值也从环境变量中来时, 会为变量都赋值后再更新. 例如
ENV key1=value2
ENV key1=value1 key2=${key1}
最终结果为:
key1=value1 key2=value2
ENTRYPOINT
指定镜像默认的入口命令. 该命令在启动容器时作为根命令执行. 所有传入的值作为该命令参数.
支持两种格式:
ENTRYPOINT ["executable", "param1", "param2"]: exec 调用执行
ENTRYPOINT command param1 param2: shell 中执行
此时, CMD 指令指定值将作为根命令的参数.
每一个 Dockerfile 中只允许有一个 ENTRYPOINT.
在运行时, 可以由参数 --entrypoint 覆盖掉.
VOLUME
创建一个数据卷挂载点.
格式为: VOLUME ["/data"]
运行容器可以从本机或其他容器挂载数据卷.
USER
指定运行容器时的用户名或 UID. 后续的 RUN 等指令也会使用指定的用户身份.
格式为: USER daeom
当服务不需要管理员权限时, 可以通过该命令指定运行用户, 并且可以在 Dockfile 中创建所需要的用户, 例如:
RUN groupadd -r postgres && useradd --no-log-init -r -g postgres postgres
要临时获取管理员权限可以使用 gosu 命令.
不知道这是什么
WORKDIR
为后续的 RUN, CMD, ENTRYPOINT 指令配置工作目录.
格式为: WORKDIR /path/to/workdir
可以使用多个 WORKDIR 指令, 后续命令如果参数是相对路径, 则会基于之前命令指定的路径.
为了避免错误, 建议
WORKDIR中只使用绝对路径.
ONBUILD [待]
指定当基于所生成镜像创建子镜像时, 自动执行的操作指令.
格式为: ONBUILD [INSTRUCTION]
由于该指令是隐式执行的, 推荐在镜像标签中进行标注.
STOPSIGNAL
指定该镜像所创建的容器接收退出的信号值: STOPSIGNAL signal.
HEALTHCHECK [待]
配置所启动容器如何进行健康检查 (如何判断健康与否), 有两种格式:
HELTHCHECK [OPTION] CMD command # 根据所执行命令返回值是否为 0 来判断

HELTHCHECK NONE # 禁止基础镜像中的健康检查
OPTION 可选参数有
-interval=DURATION (default: 30s): 过多久检查一次-timeout=DURATION (default: 30s): 每次检查等待结果的超时-retries=N (default: 3): 如果失败了, 重试几次才最终确定失败
SHELL
指定其他指令在执行 shell 时的默认 shell 类型:
SHELL ["executable", "parameters"]
默认值为: ["/bin/sh", "-C"].
在 Win 中使用
\, 因此建议在 Dockerfile 开头添加#escape='来指定转义符
8.2.2 操作指令
RUN
运行指定命令
格式为: RUN <command> 或 RUN ["executable", "param1", "param2"]
后者被解析为 JSON 数组.
前者会在 shell 终端中运行, 后者则用 exec 执行, 不会系统 shell 环境.
每条 RUN 指令将在当前镜像基础上执行指定命令, 并提交为新的镜像层. 当命令较长时, 可以用 \ 来换行.
CMD
用来指定启动容器时默认执行的命令. 支持三种格式
CMD ["executable", "param1", "param2"] # 相当于执行 executable param1 param2, 推荐的方式.

CMD executable param1 param2 # 在默认 shell 中执行, 提供给需要交互的应用.

CMD ["param1", "param2"] # 提供给 ENTRYPOINT 的默认参数.
每个 Dockerfile 只有一条 CMD 命令, 如果多了, 仅最后一条有效.
如果用户启动容器手动指定了运行命令, 作为 run 的参数, 则会覆盖 CMD 指定的命令.
ADD
添加内容到镜像. 格式为:
ADD <src> <dest>
将 <src> 复制到 <dest> 中.
其中 <src> 可以是 Dockerfile 所在目录的一个相对路径 (文件或目录); 也可以是一个 URL; 还可以是 tar 文件.
<dest> 可以是镜像内的绝对路径, 或者相对于工作目录 (WORKDIR) 的相对路径.
COPY
复制内容到镜像. 格式为:
COPY <src> <dest>
复制本地主机 <src> (为 Dockerfile 所在目录的相对路径, 文件或目录) 下的内容到镜像中的 <dest>. 目标不存在时会自动创建.
路径支持正则格式.
ADD和COPY指令功能类似, 在使用本地目录为源时, 推荐使用COPYjk: 有什么区别???
8.3 创建镜像
使用 docker [image] build 命令来创建镜像.
jk@jk-System-Product-Name:~$ docker build --help

Usage:  docker build [OPTIONS] PATH | URL | -

Build an image from a Dockerfile

Options:
      --add-host list           Add a custom host-to-IP mapping (host:ip)
      --build-arg list          Set build-time variables
      --cache-from strings      Images to consider as cache sources
      --cgroup-parent string    Optional parent cgroup for the container
      --compress                Compress the build context using gzip
      --cpu-period int          Limit the CPU CFS (Completely Fair Scheduler) period
      --cpu-quota int           Limit the CPU CFS (Completely Fair Scheduler) quota
  -c, --cpu-shares int          CPU shares (relative weight)
      --cpuset-cpus string      CPUs in which to allow execution (0-3, 0,1)
      --cpuset-mems string      MEMs in which to allow execution (0-3, 0,1)
      --disable-content-trust   Skip image verification (default true)
  -f, --file string             Name of the Dockerfile (Default is 'PATH/Dockerfile')
      --force-rm                Always remove intermediate containers
      --iidfile string          Write the image ID to the file
      --isolation string        Container isolation technology
      --label list              Set metadata for an image
  -m, --memory bytes            Memory limit
      --memory-swap bytes       Swap limit equal to memory plus swap: '-1' to enable unlimited swap
      --network string          Set the networking mode for the RUN instructions during build (default "default")
      --no-cache                Do not use cache when building the image
      --pull                    Always attempt to pull a newer version of the image
  -q, --quiet                   Suppress the build output and print image ID on success
      --rm                      Remove intermediate containers after a successful build (default true)
      --security-opt strings    Security options
      --shm-size bytes          Size of /dev/shm
  -t, --tag list                Name and optionally a tag in the 'name:tag' format
      --target string           Set the target build stage to build.
      --ulimit ulimit           Ulimit options (default [])
执行命令后
该命令读取指定路径下 (包括子目录) 的 Dockerfile, 并将该路径下所有数据作为上下文发送给 Docker 服务端.
Docker 服务端校验通过后 (语法), 逐条执行其中定义的指令.
遇到
ADD,COPY,RUN指令会生成一层新的镜像.最终如果镜像创建成功, 会返回一个 ID.
如果上下文过大, 会慢, 建议只放必须的文件
如果使用非上下文路径, 使用
-f来指定路径.如果指定生成镜像标签, 可以使用
-t, 该选项可以使用多次, 一次为镜像添加多个名称.
8.3.1 命令选项
docker [image] build 支持一系列选项, 以供修改创建镜像的过程.
| 选项 | 说明 |
|---|---|
--add-host list | 添加自定义的主机名到 IP 的映射. |
--build-arg list | 添加创建时的变量. |
--cache-from strings | 使用指定镜像作为缓存源. |
--cgroup-parent string | 继承的上层 cgroup. |
--compress | 用 gzip 来压缩创建的上下文数据. |
--cpu-period int | 分配的 CFS 调度器时长. |
--cpu-quote int | CFS 调度器总份额. |
-c, --cpu-shares int | CPU 权重. |
--cpuset-cpus string | 多 CPU 允许使用的 CPU. |
--cpuset-mems string | 多 CPU 允许使用的内存. |
--disable-content-trust | 不进行镜像校验, 默认为真. |
-f, --file string | Dockerfile 名称. |
--force-rm | 总是删除中间过程的容器. |
--iidfile string | 将镜像 ID 写入到文件. |
--isolation string | 容器的隔离机制. |
--label list | 配置镜像的元数据. |
-m, --memory bytes | 限制使用内存量. |
--memory-swap bytes | 限制内存和缓存的总量. |
--network string | 指定 RUN 命令时的网络模式. |
--no-cache | 创建镜像时不使用缓存. |
--platform string | 指定平台类型. |
--pull | 总是尝试获取镜像的最新版本. |
-q, --quiet | 不打印创建过程中的日志信息. |
--rm | 创建成功后自动删除中间过程容器, 默认为真. |
--security-opt strings | 指定安全相关的选项. |
--shm-size bytes | /dev/shm 的大小. |
--squash | 将创建的多层挤压放入到一层中. |
--stream | 持续获取创建的上下文. |
-t, --tag list | 指定镜像的标签列表. |
--target string | 指定创建的目标阶段. |
--ulimit ulimit | 指定 ulimit 的配置. |
8.3.2 选择父镜像
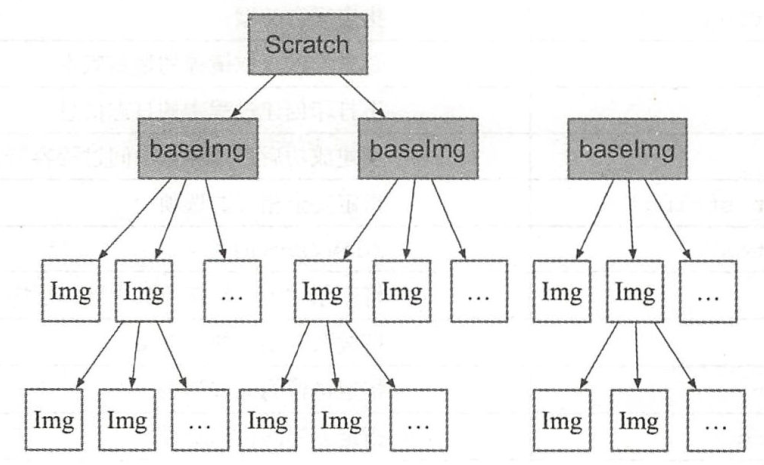
大部分情况都需要父镜像. 父镜像是基础, 关系到功能与大小. 有两种父镜像可选:
- 基础镜像 (baseimage).
- 普通镜像 (一般基于基础镜像, 由第三方构建).
基础镜像比较特殊, 可能没有
FROM. 或者基于scratch镜像 (FROM stratch).
镜像之间的继承关系为:
8.3.3 使用 .dockerignore 文件
每一行添加一个匹配模式, 忽略路径或文件, 与 .gitignore 类似.
让 Docker 忽略, 在创建镜像时不将其发给服务端.
下面例子中包括了 6 行忽略的模式 (第一行为注释):
# .dockerignore 可以定义忽略模式
*/temp*
*/*/temp*
tmp?
~*
Dockerfile
!README.md
.dockerignore 文件支持 Golang 风格的路径正则表达式
*表示任意多个字符?表示一个字符!表示不匹配
8.3.4 多步骤创建 [Docker 真的好用]
从 17.05 开始支持 多步骤创建 (Multi-stage build) 镜像. 可以精简最终生成镜像的大小.
对于需要编译型程序的环境, 常常需要两个 Docker 镜像:
- 编译环境镜像. 包含完整的编译环境, 依赖库等. 目的是将应用编译为二进制.
- 运行环境镜像. 利用编译好的二进制文件, 运行应用. 可以将编译过程需要的库排除在外, 使得镜像更小.
具体操作步骤:
- 准备需要的文件, 即会成为上下文的东西. 这里准备了一个
main.go文件和Dockerfile文件. - 执行
docker build命令.
具体操作:
$ cd ~
$ mkdir test-docker && cd test-docker
$ vim main.go
然后编辑输入
package main
import "fmt"
func main() {
    fmt.Println("Hello, Docker Multi-stage builder")
}
然后创建 Dockerfile 文件
FROM golang:1.9 as builder
RUN mkdir -p /go/src/test
WORKDIR /go/src/test
COPY main.go .
RUN CGO_ENABLED=0 GOOS=linux go build -o app .
FROM alpine:latest
RUN apk --no-cache add ca-certificates
WORKDIR /root/
COPY /go/src/test/app .
CMD ["./app"]
然后执行编译, 等待即可:
jk@jk-System-Product-Name:~/test-docker$ docker build -t jktest:0.1 .
Sending build context to Docker daemon  3.072kB
Step 1/10 : FROM golang:1.9 as builder
1.9: Pulling from library/golang
55cbf04beb70: Pull complete
1607093a898c: Pull complete
9a8ea045c926: Pull complete
d4eee24d4dac: Pull complete
9c35c9787a2f: Pull complete
8b376bbb244f: Pull complete
0d4eafcc732a: Pull complete
186b06a99029: Pull complete
Digest: sha256:8b5968585131604a92af02f5690713efadf029cc8dad53f79280b87a80eb1354
Status: Downloaded newer image for golang:1.9
 ---> ef89ef5c42a9
Step 2/10 : RUN mkdir -p /go/src/test
 ---> Running in a13cd5de2960
Removing intermediate container a13cd5de2960
 ---> cff3913c52d9
Step 3/10 : WORKDIR /go/src/test
 ---> Running in 4bf375eb6a29
Removing intermediate container 4bf375eb6a29
 ---> 0126feed7818
Step 4/10 : COPY main.go .
 ---> 899d97f749de
Step 5/10 : RUN CGO_ENABLED=0 GOOS=linux go build -o app .
 ---> Running in 6865a158859b
Removing intermediate container 6865a158859b
 ---> f96e29bcc09f
Step 6/10 : FROM alpine:latest
latest: Pulling from library/alpine
59bf1c3509f3: Pull complete
Digest: sha256:21a3deaa0d32a8057914f36584b5288d2e5ecc984380bc0118285c70fa8c9300
Status: Downloaded newer image for alpine:latest
 ---> c059bfaa849c
Step 7/10 : RUN apk --no-cache add ca-certificates
 ---> Running in c64f2adf452b
fetch https://dl-cdn.alpinelinux.org/alpine/v3.15/main/x86_64/APKINDEX.tar.gz
fetch https://dl-cdn.alpinelinux.org/alpine/v3.15/community/x86_64/APKINDEX.tar.gz
(1/1) Installing ca-certificates (20211220-r0)
Executing busybox-1.34.1-r3.trigger
Executing ca-certificates-20211220-r0.trigger
OK: 6 MiB in 15 packages
Removing intermediate container c64f2adf452b
 ---> 3d9725184ff0
Step 8/10 : WORKDIR /root/
 ---> Running in c3f493b959af
Removing intermediate container c3f493b959af
 ---> 81a8ae345660
Step 9/10 : COPY --from=builder /go/src/test/app .
 ---> 8b7f1bd8456b
Step 10/10 : CMD ["./app"]
 ---> Running in 3bc8619acb82
Removing intermediate container 3bc8619acb82
 ---> 1ed378173f0d
Successfully built 1ed378173f0d
Successfully tagged jktest:0.1
然后查看镜像:
jk@jk-System-Product-Name:~/test-docker$ docker images
REPOSITORY   TAG       IMAGE ID       CREATED         SIZE
jktest       0.1       1ed378173f0d   4 minutes ago   7.94MB
<none>       <none>    f96e29bcc09f   5 minutes ago   751MB
nginx        latest    605c77e624dd   6 months ago    141MB
node         latest    a283f62cb84b   6 months ago    993MB
alpine       latest    c059bfaa849c   7 months ago    5.59MB
golang       1.9       ef89ef5c42a9   3 years ago     750MB
使用 jktest 启动容器:
jk@jk-System-Product-Name:~/test-docker$ docker run jktest:0.1
Hello, Docker Multi-stage builder
jk@jk-System-Product-Name:~/test-docker$ docker ps -a
CONTAINER ID   IMAGE        COMMAND   CREATED         STATUS                     PORTS     NAMES
15f24c7f8513   jktest:0.1   "./app"   6 seconds ago   Exited (0) 5 seconds ago             funny_allen
8.4 最佳实践 [待]
所谓最佳实践, 就是从需求出发, 定制适合自己, 高效方便的镜像.